
In the ever-evolving landscape of business automation, integrating different software systems has become crucial for streamlining processes and enhancing productivity. One powerful integration that can significantly benefit businesses is the seamless connection between Dynamics 365 and Zoho Books. In this blog post, we’ll delve into the process of adding a custom button in Dynamics 365 that triggers an automated cloud flow to synchronize data with Zoho Books.
Understanding the Setup:
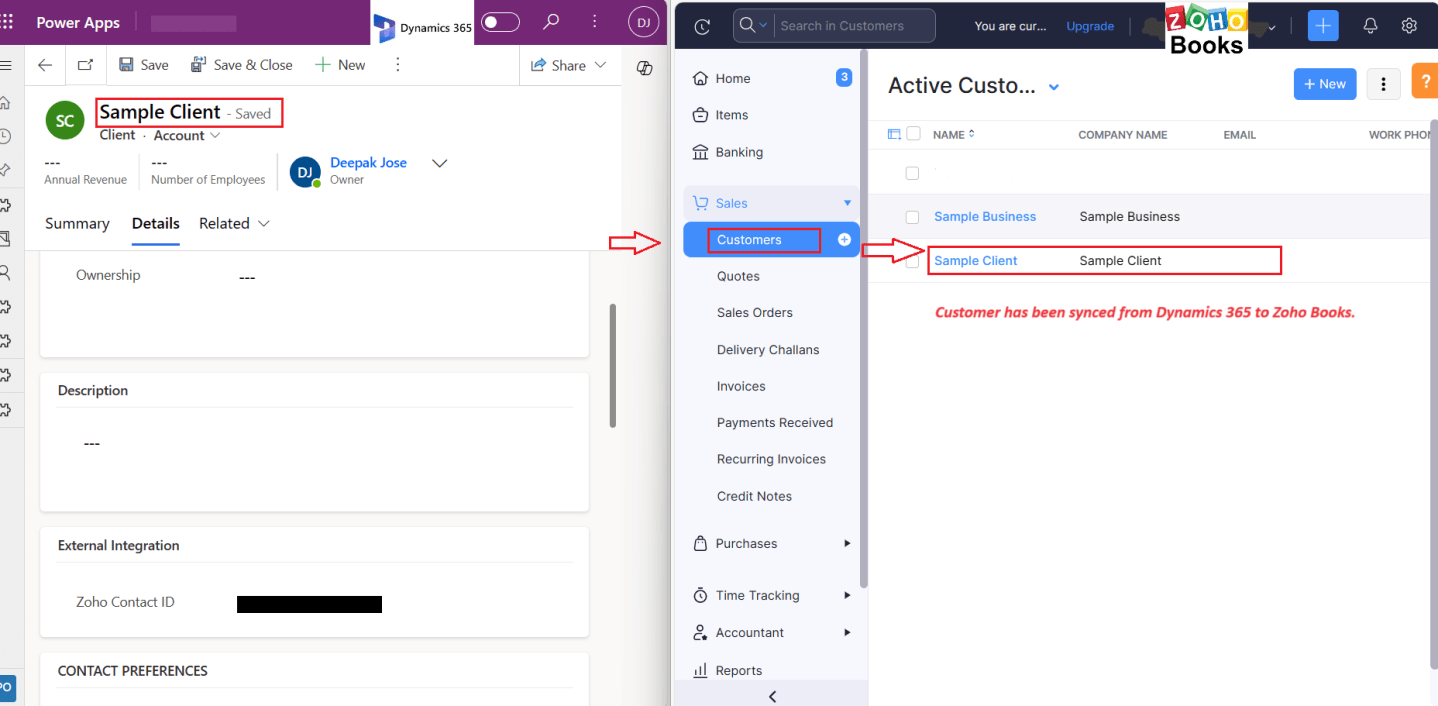
Before we get into the technical details, let’s outline the setup. We’re integrating Dynamics 365 with Zoho Books by adding a custom button to the model-driven apps interface. Clicking this button triggers a JavaScript function, which in turn initiates an automated cloud flow. This flow seamlessly sends data to Zoho Books for synchronization.
Adding the Custom Button in Dynamics 365
- Navigate to the model-driven app where you want to add the custom button.
- Edit the app and navigate to the desired entity form.
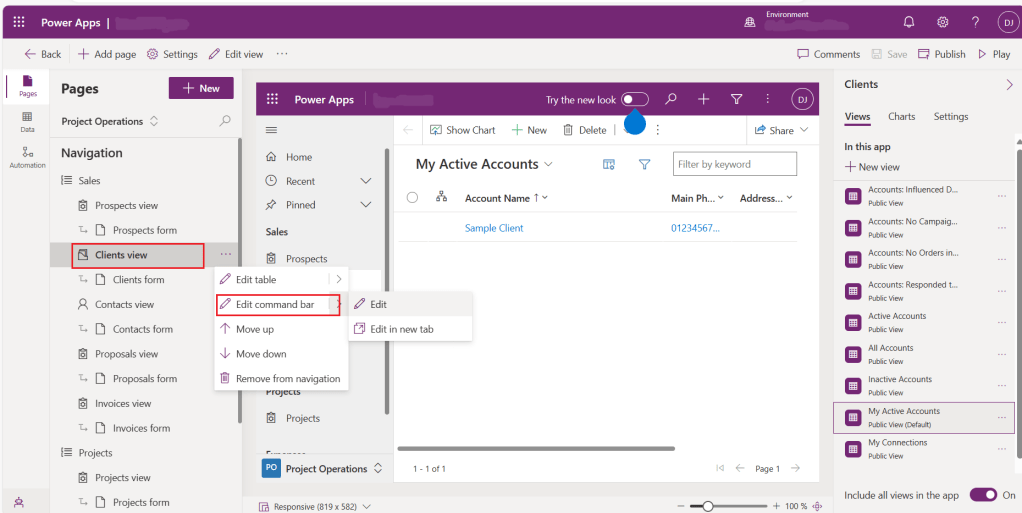
- Add a new command by clicking on
Newand selectingCommand. - Configure the button properties, such as Label, Icon, Action as
Run JavaScript, add a JavaScript library including the function name and parameter asFirstPrimaryItemId, according to your preferences.

Adding JavaScript Functionality to the Button
Now, let’s add the JavaScript function that will be executed when the custom button is clicked.
async function LaunchFlowZoho(clientid) {
    var formContext = Xrm.Page;
    if (clientid != null) {
        clientid = clientid.replace("{", "").replace("}", "");
    }
    console.log(`clientid is ${clientid}`);

    var input = JSON.stringify({
        "clientid": clientid
    });
    console.log(input);

    var flowUrl = "YOUR_FLOW_URL_HERE";

    try {
        const response = await fetch(flowUrl, {
            method: "POST",
            headers: {
                "Content-Type": "application/json"
            },
            body: input
        });

        if (response.ok) {
            console.log("Flow execution successful. Refreshing app in 5 seconds...");
            setTimeout(function() {
                // Assuming formContext is available in the context where this function is called
                formContext.ui.refresh();
            }, 5000); // 5000 milliseconds = 5 seconds

            // Display success message to the user
            var alertStrings = {
                confirmButtonLabel: "OK",
                text: "The Zoho contact ID has been updated and synchronized with the customer record in Zoho."
            };
            var alertOptions = {
                height: 120,
                width: 260
            };
            // Display alert dialog
            Xrm.Navigation.openAlertDialog(alertStrings, alertOptions);
        } else {
            // Handle non-200 response status
            throw new Error("Failed to execute flow. Status: " + response.status);
        }
    } catch (error) {
        // Display error message to the user
        alert("An error occurred: " + error.message);
    }
}
Replace "YOUR_FLOW_URL_HERE" with the URL of your automated cloud flow.
Create a Refresh Token to connect with Zoho
To seamlessly connect with Zoho’s API and facilitate secure data transmission, creating a refresh token is essential. Follow these steps to generate your refresh token:
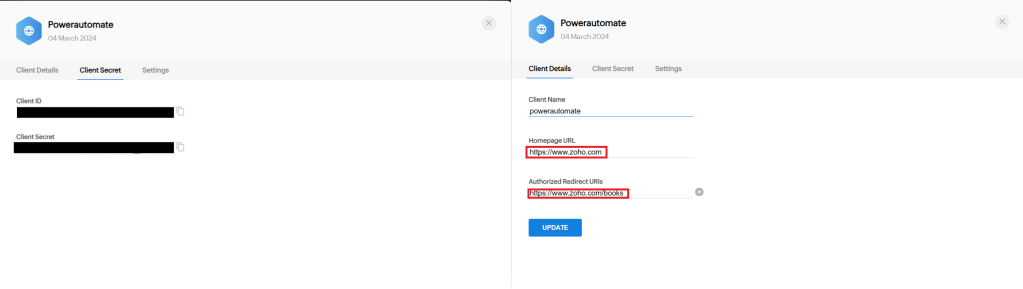
- Access Zoho API Console: Navigate to Zoho API Console to add a new client for your server-based application.

- Copy Client ID, Client Secret, and Authorized Redirect URIs: Upon adding the client, you’ll receive a Client ID, Client Secret, and Authorized Redirect URIs(which can be dummy URL). Copy these credentials as they will be required for further authentication steps.
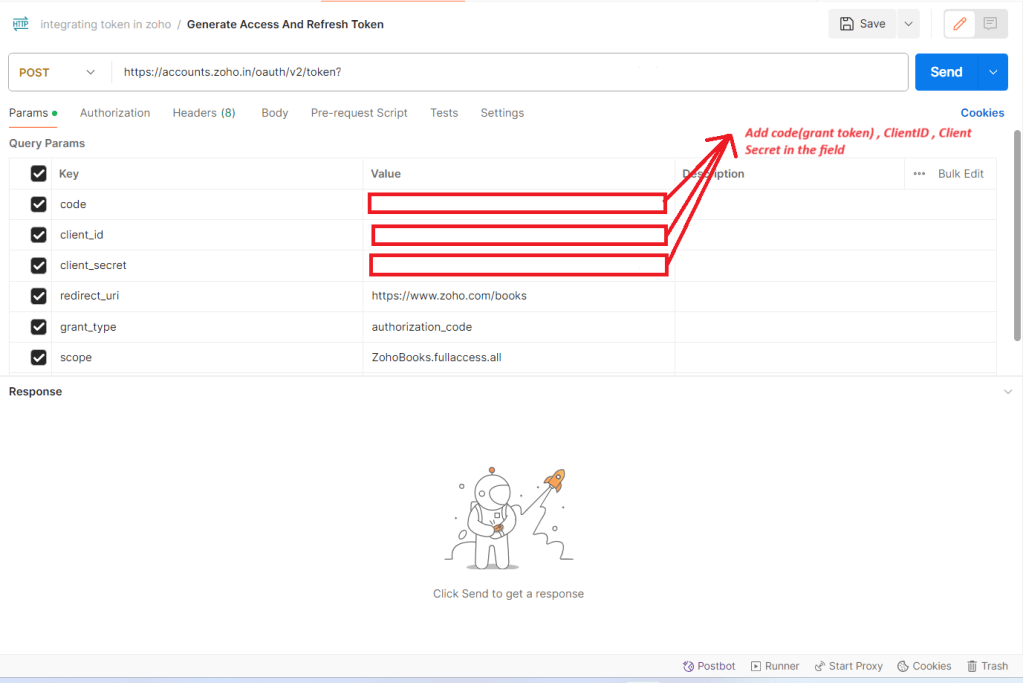
- Use Credentials to Fetch Grant Token: Utilize the copied Client ID, Client Secret, and Authorized Redirect URIs to fetch a grant token from Zoho’s API. This token serves as a temporary authorization token, with an expiration period of 10 minutes.
Here’s a sample URL for OAuth authorization:
https://accounts.zoho.com/oauth/v2/auth?scope=ZohoBooks.contacts.CREATE,ZohoBooks.contacts.READ,ZohoBooks.contacts.UPDATE,ZohoBooks.contacts.DELETE&client_id=YOUR_CLIENT_ID&state=testing&response_type=code&redirect_uri=https://www.example.com/redirect&access_type=offlineReplace YOUR_CLIENT_ID with your actual client ID provided by Zoho. Additionally, replace https://www.example.com/redirect with the actual redirect URI configured in your Zoho API settings. This URL will initiate the OAuth authorization flow for your application, enabling access to Zoho Books contacts with the specified permissions and also create a grant token which will enable to fetch refresh and access token.
- Obtain Refresh Token: After obtaining the grant token, proceed to exchange it for a refresh token. This refresh token functions as a long-term authentication token, granting access to an access token for every API call. This enables your server-based application to securely access Zoho’s API for seamless integration and interaction with Zoho’s services.
Note: Refer to the Zoho API Documentation for more detailed information and instructions regarding OAuth authentication and token management.
Creating the Automated Cloud Flow
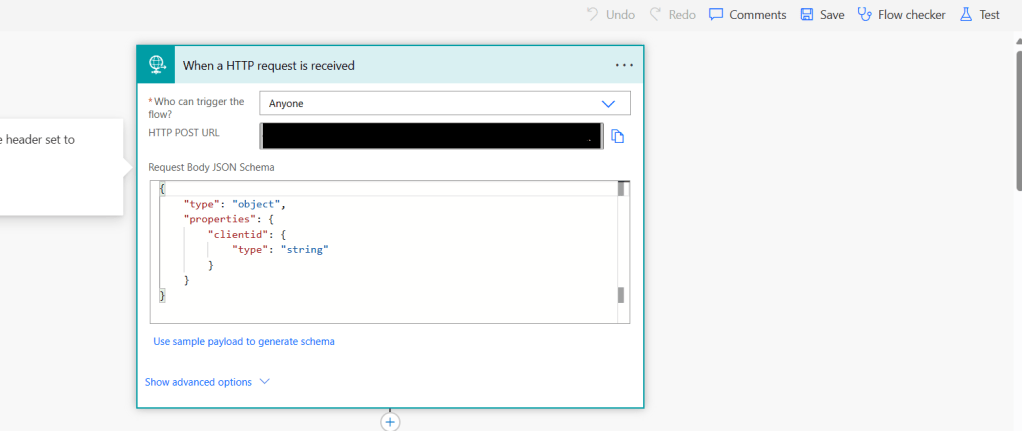
- Trigger Configuration: Start by creating a new cloud flow with the trigger
'When a HTTP request is received'This trigger will be activated when the custom button is clicked in Dynamics 365, passing the client ID to initiate the flow.
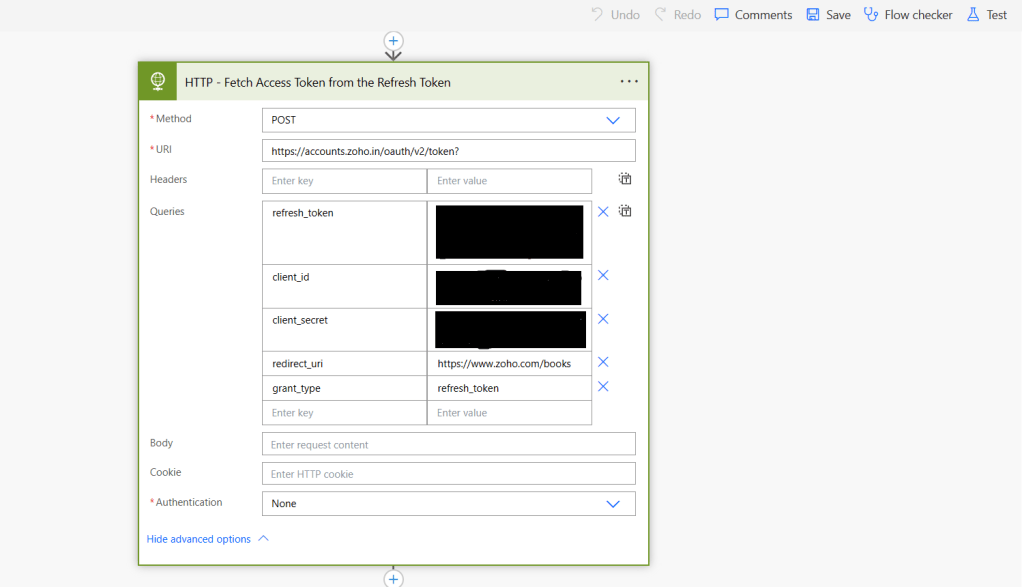
- Access Token Retrieval: Use the HTTP connector to obtain an access token. This token is necessary for authentication when accessing Zoho Books’ API.
- Fetching Customer Details: Utilize the
'Get a row by ID'action to fetch the details of the customer from Dataverse (formerly known as Common Data Service). This step ensures that we have the relevant data required for creating the contact in Zoho Books.

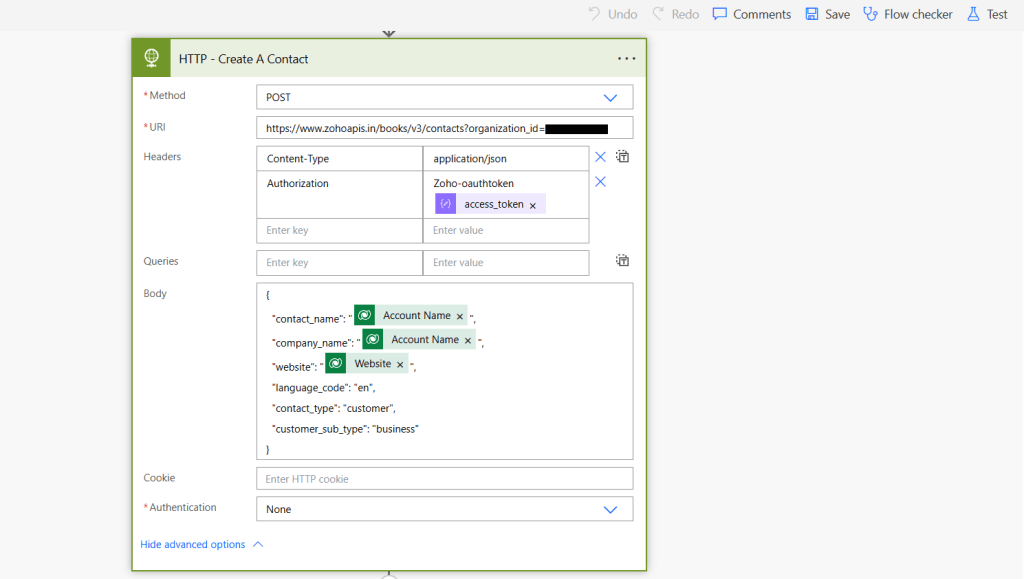
- Creating Contact in Zoho Books: Employ the HTTP connector again to create a contact in Zoho Books. Post API, add the client ID and customer details obtained from Dataverse. This completes the process of creating a contact in Zoho Books, ensuring seamless data synchronization between the two platforms.
Conclusion
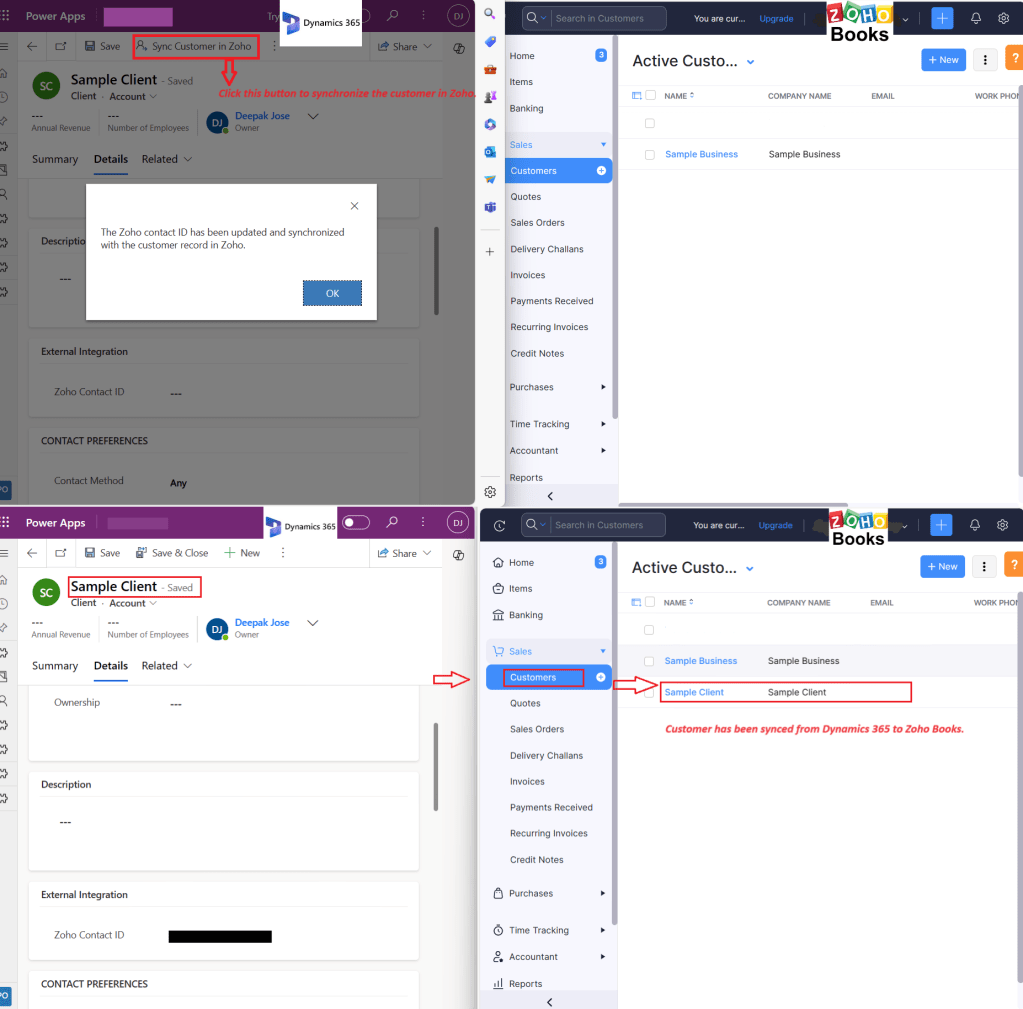
By automating the integration between Dynamics 365 and Zoho Books, businesses can streamline their processes and improve productivity. The custom button and automated cloud flow facilitate seamless data synchronization, enabling efficient management of customer information across platforms.
