
This blog guides you through, how to pass parameters from model-driven app to custom pages while opening custom page as a central dialog inside form using button, in order to upload documents to the respective record’s folders in SharePoint.
This Functionality was achieved by adding buttons to forms in model-driven apps using the new command editing feature available in power apps.
REQUIREMENT:
A button is added on the account form in model-driven app to navigate to a custom page by passing that corresponding record’s id parameter to the pages.
Here, this custom page is used for uploading onboarding documents of their respective records in SharePoint. With the use of Custom pages and Power Automate, this functionality was achieved.
JavaScript Code:
The JScript Code required for opening a custom page as central dialog inside the form and also for passing record id parameters from the respective form in Model-driven app to custom page is given below:
function openPageInlineWithContext(pageContext){
var rec = pageContext.data.entity.getId();
var record = rec.replace(/[{}]/g,””);
Xrm.Navigation.navigateTo({
pageType: “custom”,
name: “dyn_uploaddocumentspage_ed617”,
entityName: pageContext.data.entity.getEntityName(),
recordId: record },
{ target:2,
width: 780,
height: 500,
title: “Upload Onboarding Documents”}
).then( function () { // Handle error }
).catch(
function (error) { // Handle error } );
}
Firstly, the code given above should be added to web resources of the same solution that has Model-driven app and custom page and also publish those web resources.
Working with Custom Page:
Step 1: Grab the record Id, i.e., account ID of the form where the custom page dialog was opened.
For that we go to App > OnStart and grab there the Param “recordId” from Jscript code and save it in a variable: “RecordItem”.

The power fx formula used in App “OnStart” is given below:
Set(RecordItem,
If(IsBlank(Param(“recordId”)),
Blank(),
LookUp(Partners, Account = GUID(Param(“recordId”)))))
Step 2: Insert an “Edit Form” control in the page for purpose of capturing this “recordId”.


Now, for the purpose of capturing this value in the “RecordItem” variable into this ‘Edit form’ control inserted, associate this Edit form control’s Data Source and Item properties to “Partners” (Accounts Table) and “RecordItem” variable respectively as depicted in Fig 2 and 3 above.
So, the purpose of this custom page is to upload onboarding documents to the existing or newly created folders of their respective records in SharePoint. This functionality is achieved with help of calling a power automate flow from custom page.
Step 3: Insert an “Upload” Button to call the automate flow for uploading onboarding documents to SharePoint.
So, the power apps Inputs from custom page that will be passed to automate flow for triggering the flow are given below:
Input 1- Text: The First input selected is the “DataCardValue6” as shown in Fig.4 below, to which the “recordId” from Jscript code will get populated, that was set through the variable “RecordItem” as mentioned earlier in Step 2.

Input 2- File Content: Select a ‘File’ type field from any of the tables and place that field separately here in the custom page, for the purpose of attaching files. Set the selected File DataCardValue11’s Item and Display Mode properties to “Blank ()” and “Edit” respectively as referred in Fig.5 below.

Now, Set the “Upload” Button’s “On Select” properties to the formula as shown in Fig.6, in order to call the automate flow for passing the above-mentioned inputs to the flow and trigger it for uploading the onboarding documents to their respective record’s folders in SharePoint.

The Power fx Formula used in the “OnSelect” property of the “Upload” button is given below:
‘Dynatecon-Test-Attachdocuments’.Run(DataCardValue6.Value, {file: {
name: First(DataCardValue11.Attachments).Name,
contentBytes: First(DataCardValue11.Attachments).Value }});
From the formula given above, ‘Dynatecon-Test-Attachdocuments’ is the name of the power automate flow used and the two power apps inputs such as Text input (“DataCardValue6.Value” for passing “recordId”) and File content inputs are also passed from custom page to the automate flow.
For getting more idea about the above mentioned power automate flow used in this custom page for uploading onboarding documents to its respective record’s folders in SharePoint, you can refer to the blog post link given below.
Blog Post Link: https://dynatecon.com/2022/07/20/how-to-upload-documents-from-custom-page-to-their-respective-records-folders-in-sharepoint/
Calling the Custom Page Dialog from the Ribbon using New Command Editing in Power Apps:
Now, for adding a command button to the “Partners” (Account) Form to open the custom page dialog, we need to open Model-Driven App in the respective solution in editing mode.

The App will open in modern designer view and you can see all the tables in Pages area in left pane. Then click on the ‘three’ dots of “Partner” (Account) Subarea and click on the ‘Edit Command bar’ as noted in Fig.8 below.

It will open the command bar editor window and will ask in which area you want to insert the command button. Hence as shown in Fig.9 below, in our case we choose the “main form” out of the other three options for adding button.

Hence, it will open the designer and you can choose a button from left pane. Also, set button’s command properties in right pane to the following as depicted in Fig.10 below.

I have the library “dyn_/Scripts/Partners_Form.js” and my function used here is called “openPageInlineWithContext”. Also, pass the “Primary Control” to your function since you are in form.
To call the custom page from the new (Ribbon) commanding, we need the below-mentioned JavaScript code based on Xrm.Navigation.navigateTo. To pass the id to the custom page, you need to define a JavaScript file and pass the needed parameters as mentioned above.
Given below is the JavaScript code used (notice the “pageContext” parameter and using it for EntityName and recordId):
function openPageInlineWithContext(pageContext){
var rec = pageContext.data.entity.getId();
var record = rec.replace(/[{}]/g,””);
Xrm.Navigation.navigateTo({
pageType: “custom”,
name: “dyn_uploaddocumentspage_ed617”,
entityName: pageContext.data.entity.getEntityName(),
recordId: record },
{ target:2,
width: 780,
height: 500,
title: “Upload Onboarding Documents”}
).then( function () { // Handle error }
).catch(
function (error) { // Handle error } ); }
Note:
var record = rec.replace(/[{}]/g,””);
This step in the JScript code above is used for replacing the curly brackets before calling the GUID function.
Once, you have finished all these above-mentioned customizations in the new command editing, then click on “Save and Publish” for publishing the command button.
How Button Works:
Now, let’s see how the “Upload” button works inside the Form in Model-Driven App:

As depicted in Fig.11, In the “Partners” (Account) Form, we have an “Upload” button to open the custom page dialog for attaching onboarding documents.

The custom page is now opened as a dialog as shown in Fig.12. It has a provision for attaching the onboarding document files.

As noted in Fig.13, after attaching files, click on the ‘Upload’ button in the page that triggers the automate flow and uploads those documents into SharePoint.
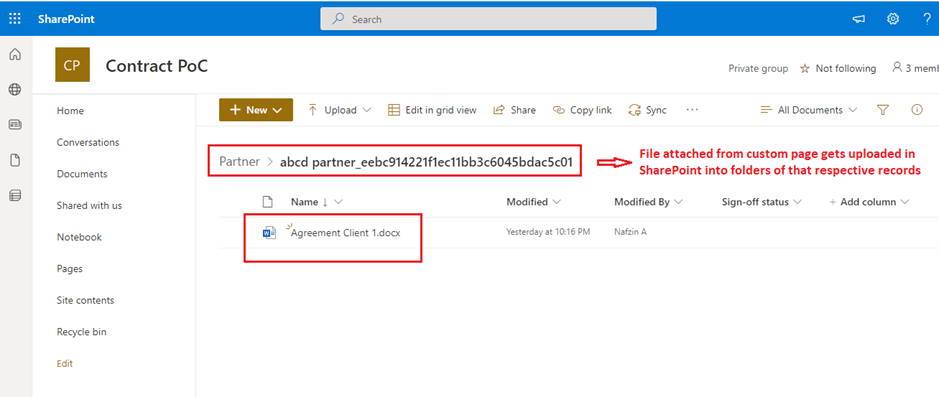
Therefore, as depicted in Fig.14 the files attached from custom page gets uploaded into the respective newly created or already existing record’s folders in SharePoint.
Hope this was helpful!
