

In today’s digital landscape, effective data management is essential for organizations to operate efficiently and make informed decisions. However, managing data across different platforms and systems can often be a daunting task. In this blog post, we’ll explore how to build a modern web application that seamlessly integrates a React frontend with a Node.js backend and utilizes SharePoint as a database, providing a robust solution for streamlined data management.
While the article guides you through the import functionality of the code, you can download the project to see the full source code and test the functionality for yourself.
Understanding the Tech Stack:
React Frontend: React.js has emerged as a leading JavaScript library for building user interfaces. Its component-based architecture and virtual DOM make it ideal for creating dynamic and responsive web applications. With React, developers can build interactive UI components and efficiently manage state across the application. Learn more about React.js
Node.js Backend: Node.js, a server-side JavaScript runtime, offers a powerful platform for building scalable and performant backend services. Its event-driven, non-blocking I/O model enables developers to handle concurrent requests efficiently. With Node.js, developers can build RESTful APIs, perform data processing tasks, and integrate with various data sources. Learn more about Node.js
SharePoint Integration: SharePoint, Microsoft’s collaboration platform, serves as a central repository for storing, organizing, and sharing documents and data within organizations. By integrating with SharePoint, developers can leverage its robust document management capabilities and access data programmatically using the SharePoint REST API. Learn more about SharePoint
Setting Up the Development Environment
1. Required Tools and Software:
- Node.js and npm: Install from nodejs.org.
- React.js: Create a new React project using Create React App.
- SharePoint site: Ensure you have access to a SharePoint site.
2. Installing Node.js and npm:
First, check if Node.js and npm are installed on your system:
# Check if Node.js and npm are installed
node -v
npm -v

# If not installed, download and install from nodejs.org
If not installed, download and install Node.js from nodejs.org.
3. Creating a React Project:
npx create-react-app sharepoint-react-integration
cd sharepoint-react-integration
3. Initializing a Node.js Project:
Create a backend directory and initialize a Node.js project within it:
mkdir backend
cd backend
npm init -y
npm install express nodemon axios cors fs formidable dotenv
Edit the package.json file to replace the start script:
"scripts": {
  "start": "nodemon src/index.js"
}
4. Creating the Backend:
Register the model-driven app and SharePoint URL in Azure AD, and obtain the client_id, client_secret, and tenant_id. Ensure that you grant CRUD (Create, Read, Update, Delete) access in both SharePoint and Azure.
Create src/index.js:
const express = require('express');
const cors = require('cors');

const {
  getSharePointDocumentLocation,
  uploadToSharePoint,
  downloadFromSharepoint,
  deleteFileFromSharePoint
} = require('./controllers');

const app = express();
const PORT = process.env.PORT || 5000;

app.use(cors());
app.use(express.json());

// Define routes
app.get('/api/sharepointdocumentlocation/:name', getSharePointDocumentLocation);
app.post('/api/uploadToSharePoint', uploadToSharePoint);
app.get('/api/downloadfromSharepoint', downloadFromSharepoint);
app.delete('/api/deleteFileFromSharePoint',deleteFileFromSharePoint);

app.listen(PORT, () => {
  console.log(`Server is running on port ${PORT}`);
});
Create src/routes.js:
const express = require('express');
const { getSharePointDocumentLocation, uploadToSharePoint ,downloadFromSharepoint, deleteFileFromSharePoint } = require('./controllers');

const router = express.Router();

// Define routes
router.get('/api/sharepointdocumentlocation/:name', getSharePointDocumentLocation);
router.post('/api/uploadToSharePoint', uploadToSharePoint);
router.get('/api/downloadfromSharepoint', downloadFromSharepoint);
router.delete('/api/deleteFileFromSharePoint',deleteFileFromSharePoint);


module.exports = {
  setupRoutes: (app) => {
    app.use(router);
  },
};
Create src/controllers.js file and implement functionality to fetch sharepoint data.
A. Fetch Dataverse and SharePoint Access Token
First, we need to authenticate with SharePoint and Dataverse to get an access token. This token is required for subsequent API calls to Dataverse and SharePoint.
const getDataverseAccessToken = async () => {
  if (DataverseaccessToken && Date.now() < tokenExpirationTime) {
    return DataverseaccessToken;
  }
  try {
    const clientId = process.env.clientId;
    const clientSecret = process.env.client_secret;
    const tenantId = process.env.tenantId;
    const resource = process.env.scope;
    const tokenEndpoint = `https://login.microsoftonline.com/${tenantId}/oauth2/v2.0/token`;

    const response = await axios.post(
      tokenEndpoint,
      new URLSearchParams({
        grant_type: 'client_credentials',
        client_id: clientId,
        client_secret: clientSecret,
        scope: resource,
      })
    );

    DataverseaccessToken = response.data.access_token;
    tokenExpirationTime = Date.now() + response.data.expires_in * 1000;

    return DataverseaccessToken;
  } catch (error) {
    console.error('Error fetching access token:', error.response?.status, error.response?.data);
    throw new Error('Error fetching access token');
  }
};
/*----------------------------------------------GET Sharepoint Access Token-------------------------------------------------------*/
const getSharePointAccessToken = async () => {
  // Check if the current access token is still valid
  if (SharePointaccessToken && Date.now() < SPtokenExpirationTime) {
    return SharePointaccessToken; // Return the existing token if it's still valid
  }

  try {
    // Retrieve environment variables from process.env
    const clientId = process.env.clientId;
    const clientSecret = process.env.client_secret;
    const tenantId = process.env.tenantId;
    const scope = process.env.SPscope;

    const tokenEndpoint = `https://login.microsoftonline.com/${tenantId}/oauth2/v2.0/token`;

    // Send POST request to token endpoint to obtain access token
    const response = await axios.post(tokenEndpoint, new URLSearchParams({
      grant_type: 'client_credentials',
      client_id: clientId,
      client_secret: clientSecret,
      scope: scope,
    }));

    // Validate the response
    if (!response.data.access_token || !response.data.expires_in) {
      throw new Error('Invalid response from token endpoint');
    }

    // Store the access token and its expiration time
    SharePointaccessToken = response.data.access_token;
    SPtokenExpirationTime = Date.now() + response.data.expires_in * 1000; // Convert seconds to milliseconds

    // Return the access token
    return SharePointaccessToken;
  } catch (error) {
    console.error('Error fetching access token:', error);
    throw new Error('Error fetching access token');
  }
};
This function checks if an existing token is still valid. If not, it requests a new token from the Microsoft identity platform.
B. Get SharePoint Document Location
Next, we need to retrieve the document location from SharePoint based on a specific entity in Dataverse.
const getSharePointDocumentLocation = async (req, res) => {
  try {
    const { name } = req.params;

    // Ensure we have valid access tokens
    const [dataverseAccessToken, sharePointAccessToken] = await Promise.all([
      getDataverseAccessToken(),
      getSharePointAccessToken()
    ]);

    // Fetch SharePoint document locations
    const apiUrl = `${process.env.DataverseURL}/sharepointdocumentlocations?$filter=_regardingobjectid_value eq '${name}'`;
    const response = await axios.get(apiUrl, { headers: { Authorization: `Bearer ${dataverseAccessToken}` } });

    if (!response.data || !Array.isArray(response.data.value) || response.data.value.length === 0) {
      return res.status(404).json({ error: 'No document locations found' });
    }

    const firstDocumentLocation = response.data.value[0];
    if (!firstDocumentLocation || !firstDocumentLocation.relativeurl) {
      return res.status(404).json({ error: 'Relative URL not found in the first document location object' });
    }
    // Fetch document type choices and document details in parallel
    const [choiceResponse, documentsResponse] = await Promise.all([
      axios.get(`https://graph.microsoft.com/v1.0/sites/${process.env.SPSiteId}/lists/${process.env.SPListId}/columns`, { headers: { Authorization: `Bearer ${sharePointAccessToken}` } }),
      axios.get(`https://graph.microsoft.com/v1.0/drives/${process.env.SPDriveId}/root:/${firstDocumentLocation.relativeurl}:/children`, { headers: { Authorization: `Bearer ${sharePointAccessToken}` } })
    ]);

    if (!choiceResponse.data || !Array.isArray(choiceResponse.data.value)) {
      return res.status(500).json({ error: 'Error fetching document type choices' });
    }
    const folderId =documentsResponse.data.value[0].parentReference.id;
    const documentTypeColumn = choiceResponse.data.value.find(column => column.displayName === 'Document Type');
    if (!documentTypeColumn || !documentTypeColumn.choice) {
      return res.status(404).json({ error: 'Document Type column not found or it\'s not a choice column' });
    }

    const documentTypeChoices = documentTypeColumn.choice.choices;
    const documentType = documentTypeChoices;
    // console.log(documentType,"Types")

    if (!documentsResponse.data || !Array.isArray(documentsResponse.data.value)) {
      return res.status(500).json({ error: 'Error fetching document details' });
    }

    const documentsData = await Promise.all(documentsResponse.data.value.map(async item => {
      const metadataUrl = `https://graph.microsoft.com/v1.0/drives/${process.env.SPDriveId}/items/${item.id}/listItem`;
      const metadataResponse = await axios.get(metadataUrl, { headers: { Authorization: `Bearer ${sharePointAccessToken}` } });

      const customColumns = metadataResponse.data.fields || {};
      return {
        UniqueId: item.id,
        fileName: item.name,
        timeLastModified: item.lastModifiedDateTime,
        modifiedByTitle: item.lastModifiedBy ? item.lastModifiedBy.user.displayName : 'Unknown',
        downloadUrl: item["@microsoft.graph.downloadUrl"],
        documentType: customColumns.DocumentType,
        documentID: customColumns.DocumentID
      };
    }));

    // Extract fileDetails and documentType
    const fileDetails = documentsData.map(doc => ({
      UniqueId: doc.UniqueId,
      fileName: doc.fileName,
      timeLastModified: doc.timeLastModified,
      modifiedByTitle: doc.modifiedByTitle,
      downloadUrl: doc.downloadUrl,
      documentID: doc.documentID,
      documentType: doc.documentType,
    }));
    // console.log(fileDetails);
    // Send fileDetails and documentType to the frontend
    res.status(200).json({ fileDetails, documentType ,folderId });
  } catch (error) {
    console.error('Error fetching SharePoint requests:', error.response?.status, error.response?.data);
    res.status(500).json({ error: 'Internal server error' });
  }
};
This function fetches document locations from SharePoint based on the provided entity name. It then retrieves document details and their metadata.
C. Upload Files to SharePoint
The file upload functionality allows you to upload files to a specific SharePoint folder and update their metadata.
const uploadToSharePoint = async (req, res) => {
  const form = new formidable.IncomingForm();
  form.parse(req, async (err, fields, files) => {
    if (err) {
      return res.status(400).send('Error parsing the files');
    }

    const file = files.file;
    if (!file) {
      return res.status(400).send('No file uploaded');
    }
    const filePath = file[0].filepath;
    const fileName = fields.filename[0];
    const folderPath = fields.FolderPath[0];
    const documentType = fields.documentType[0];
    const documentId = fields.documentID[0];

    try {
      const sharePointAccessToken = await getSharePointAccessToken();
      // Construct the upload URL
      const uploadUrl = `https://graph.microsoft.com/v1.0/drives/${process.env.SPDriveId}/items/${folderPath}:/${fileName}:/content`;
      const fileBuffer = fs.readFileSync(filePath);
      // Set up the headers with the access token
      const headers = {
          'Authorization': `Bearer ${sharePointAccessToken}`,
          'Content-Type': 'application/json',
      };

      // Upload the file content using PUT request
      const response = await axios.put(uploadUrl, fileBuffer, { headers });
      // Construct the metadata update URL
      const metadataUrl = `https://graph.microsoft.com/v1.0/drives/${process.env.SPDriveId}/items/${folderPath}:/${fileName}:/listItem/fields`;

      // Payload for updating the document metadata
      const metadataPayload = {
        DocumentType: documentType,
        DocumentID: documentId
      };

      // Update the file metadata using PATCH request
      const metadataResponse = await axios.patch(metadataUrl, metadataPayload, { headers });

      res.status(200).send(`File '${fileName}' uploaded and metadata updated successfully`);
    } catch (error) {
      console.error('Error uploading files to SharePoint:', error);
      res.status(500).send(`Failed to upload file '${fileName}' to SharePoint`);
    }
  });
};
This code handles file uploads to SharePoint and updates the file’s metadata with the specified document type and document ID. It uses formidable for parsing the incoming form data.
D. Download Files from SharePoint
The following function allows users to download files from SharePoint by providing the id of the file.
const downloadFromSharepoint = async (req, res) => {
  try {
    // Extract id from query parameters
    const { id } = req.query;

    // Ensure we have a valid SharePoint access token
    const sharePointAccessToken = await getSharePointAccessToken();

    // Fetch the item metadata using the UniqueId
    const metadataUrl = `https://graph.microsoft.com/v1.0/drives/${process.env.SPDriveId}/items/${id}`;
    const metadataResponse = await axios.get(metadataUrl, { headers: { Authorization: `Bearer ${sharePointAccessToken}` } });

    if (!metadataResponse.data) {
      return res.status(404).json({ error: 'Document not found' });
    }

    // Get the download URL from the metadata response
    const downloadUrl = metadataResponse.data["@microsoft.graph.downloadUrl"];
    // Redirect to the download URL
    res.status(200).json({downloadUrl});
  } catch (error) {
    console.error('Error fetching SharePoint document:', error.response?.status, error.response?.data);
    res.status(500).json({ error: 'Internal server error' });
  }
};
This function authenticates with SharePoint, constructs the download URL, which is then sent to the client.
E. Delete Files from SharePoint
Finally, the code to delete a file from SharePoint by its id.
const deleteFileFromSharePoint = async (req, res) => {
  try {
  const { id } = req.query;
  const { fileName } = req.query;
  console.log(id, "filepath");

  // Ensure we have a valid SharePoint access token
  const sharePointAccessToken = await getSharePointAccessToken();

  // Delete the item using the UniqueId
  const deleteUrl = `https://graph.microsoft.com/v1.0/drives/${process.env.SPDriveId}/items/${id}`;
  await axios.delete(deleteUrl, { headers: { Authorization: `Bearer ${sharePointAccessToken}` } });

  // Respond with success message

      res.status(200).send(`File ${fileName} deleted.`);
    } catch (error) {
      console.error('Error deleting SharePoint document:', error.response?.status, error.response?.data);
      res.status(500).json({ error: 'Internal server error' });
    }
  };
Create a .env file:
PORT=5000
tenantId="<Enter valid tenant Id>"
clientId="<Enter valid client Id>"
client_secret="<Enter valid client secret>"
scope="<environment-url>/.default"
SPscope=https://graph.microsoft.com/.default
SPSiteId="<your-sharepoint-siteId>"
SPDriveId="<your-sharepoint-driveId>"
SPListId="your-sharepoint-listId"
5. Creating the React Frontend:
In your React project, install the necessary dependencies:
npm install @emotion/styled @mui/icons-material @mui/material @mui/x-data-grid axios momentUse the following code to retrieve the SharePoint data from the backend:
const getSharepointDatas = async () => {
  try {
    const sharepointResponse = await api.get(`http://localhost:5000/api/sharepointdocumentlocation/${name}`);
    const sharepointData = sharepointResponse.data;
    setSPData(sharepointData);
  } catch (error) {
    console.error('Error fetching SharePoint request:', error);
  }
};
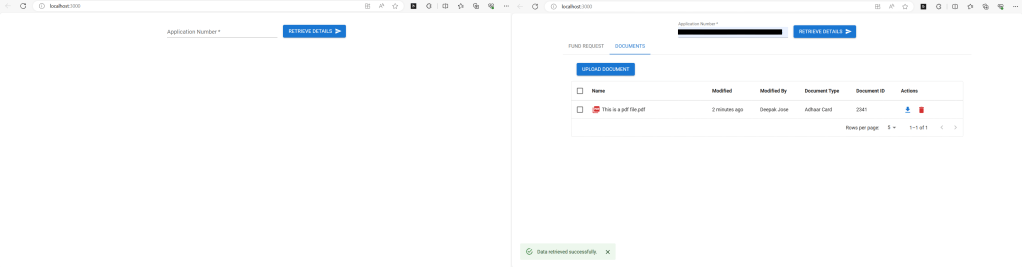
Add the DataGrid component from Material-UI into the React component to display SharePoint data in a table:
<TextField
        id="standard-basic"
        required
        variant="standard"
        value={name}
        onChange={handleInputChange}
        label="Application Number"
        name="applicationno"
        style={{ width: '20rem' }}
      />
      <Button
        onClick={getfundingrequests}
        variant="contained"
        style={{ marginTop: '0.7rem', marginLeft: '1rem' }}
        endIcon={<SendIcon />}
      >
        Retrieve Details
      </Button>

      {sPData && (<DataGrid
        rows={sPData.fileDetails}
        columns={columns}
        getRowId={getRowId}
        initialState={{
          pagination: {
            paginationModel: { page: 0, pageSize: 5 },
          },
        }}
        pageSizeOptions={[5,10]}
        pagination
        checkboxSelection
        autoHeight
      />    )}
Use the following code to upload the file into the backend:
const handleConfirmUpload = async () => {
  setOpenDialog(false); // Close the dialog
  try {
    if (!selectedFile) {
      setSnackbarMessage('Please select a file.');
      setSnackbarSeverity('error');
      setShowSnackbar(true);
      return;
    }
    if (!selectedDocumentType) {
      setSnackbarMessage('Please select a document type.');
      setSnackbarSeverity('error');
      setShowSnackbar(true);
      return;
    }
    if (!documentID) {
      setSnackbarMessage('Please enter a document ID.');
      setSnackbarSeverity('error');
      setShowSnackbar(true);
      return;
    }

    const formData = new FormData();
    formData.append('file', selectedFile);
    formData.append('filename', selectedFile.name);
    formData.append('FolderPath', sPData.folderId);
    formData.append('documentType', selectedDocumentType);
    formData.append('documentID', documentID);

    const response = await api.post(`http://localhost:5000/api/uploadToSharePoint`, formData, {
      headers: {
        'Content-Type': 'multipart/form-data',
      },
    });
  } catch (error) {
    console.error('Error uploading file:', error);
    setSnackbarMessage(`${error.message}`);
    setSnackbarSeverity('error');
    setShowSnackbar(true);
  } finally {
    setSelectedFile(null); // Reset the selected file
    setSelectedDocumentType(''); // Reset the selected document type
    setDocumentID('');//Rest the Document Id
  }
};
Use the following code to download the file into the backend:
const handleDownloadPdf = async (row) => {
    if (row && row.UniqueId) {
      try {
        const response = await api.get(
          `http://localhost:5000/api/downloadfromSharepoint`,
          { params: { id: row.UniqueId }});
        const downloadUrl = response.data.downloadUrl; // Ensure this is how you are accessing the URL
        console.log(downloadUrl,"url")
      // Check if the URL is valid and not empty
      if (downloadUrl) {
        // Create a link element to trigger the download
        const link = document.createElement('a');
        link.href = downloadUrl;

        // Append the link to the document body and trigger the download
        document.body.appendChild(link);
        link.click();

        // Clean up after the download is initiated
        link.remove();
        window.URL.revokeObjectURL(downloadUrl);
      setSnackbarMessage('File downloaded successfully.');
        setSnackbarSeverity('success');
        setShowSnackbar(true);
      } else {
        throw new Error('Invalid download URL');
      }
    } catch (error) {
      console.error('Error downloading file:', error);
      setSnackbarMessage(error);
      setSnackbarSeverity('error');
      setShowSnackbar(true);
    }
    }
  };
Use the following code to delete the file from the sharepoint:
const handleConfirmDelete = async () => {
  setOpenDeleteDialog(false);
  if (selectedRow && selectedRow.UniqueId) {
    try {
      const response = await api.delete('http://localhost:5000/api/deleteFileFromSharePoint', {
        params: { id: selectedRow.UniqueId, fileName: selectedRow.fileName }});
      setSnackbarMessage(`${response.data}`);
      setSnackbarSeverity('success');
      setShowSnackbar(true);
    } catch (error) {
      console.error('Error deleting file:', error);
      setSnackbarMessage('Failed to delete file.');
      setSnackbarSeverity('error');
      setShowSnackbar(true);
    }
  }
  setSelectedRow(null);
};
6. Running the Application:
Start the Node.js server:
cd backend
npm start
Start the React development server:
cd ..
npm start
Conclusion:
In this blog post, we’ve explored how to build a modern web application that integrates a React frontend with a Node.js backend and leverages SharePoint as a database. This approach provides a robust solution for managing data efficiently and seamlessly within an organization. By combining the power of React, Node.js, and SharePoint, developers can create dynamic and interactive applications that streamline data management processes and enhance collaboration.
Feel free to download the project and explore the source code for a deeper understanding of the implementation. Happy coding!
