

If you’ve ever worked with Model-Driven Power Apps, you’re probably familiar with the challenges posed by N:N (Many-to-Many) relationships and the need for multi-select controls to efficiently manage related records. In this blog post, we’ll introduce you to an N:N Multi-Select control for Model-Driven Power Apps and explore how we’ve enhanced it with filtering capabilities, streamlining the process of selecting related records based on specific criteria.

Understanding the Original Control
The N:N Multi-Select control enables users to choose multiple related records from a separate entity. It’s built using the Power Apps Component Framework (PCF), making it a valuable tool. The core components include the primary container, data structures for managing related records, and event handlers for selecting and deselecting records. These selected records are associated with the current record in the N:N relationship.

Prerequisites
Before we embark on enhancing the control with filtering, it’s essential to ensure that you have the following prerequisites installed in your development environment:
- Visual Studio Code (VSCode) with “Add to PATH” selected during installation.
- Node.js (LTS version for stability).
- Microsoft Power Platform CLI:
- Power Platform Tools for Visual Studio Code or Power Platform CLI for Windows.
- .NET Build Tools:
- .NET Core SDK (cross-platform .NET framework) or Visual Studio with “.NET build tools” workload.
Adding Filtering Functionality
Now, let’s focus on the primary goal: adding filtering functionality to the N:N Multi-Select control. This feature will enable users to narrow down their selection of related records based on specific criteria, enhancing the control’s usability.
Step 1: Import the Original N:N Multi-Select PCF-Control
Obtain the source code from the GitHub repository GitHub Link. Open it in VSCode and use the integrated terminal to install necessary Node modules with npm install.
Step 2: Add the Lookup Filter Property
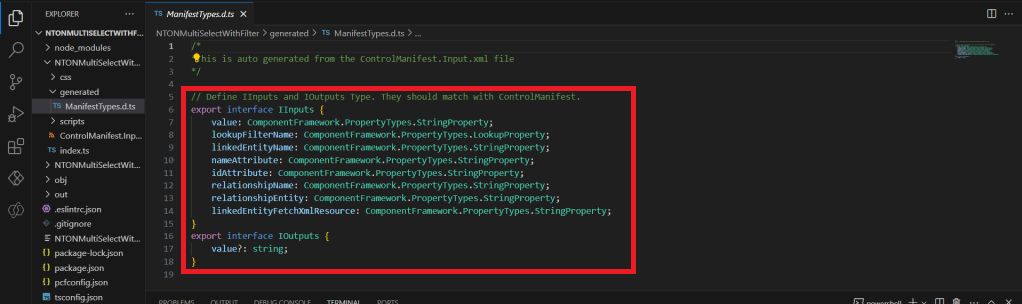
In the ControlManifest.Input.xml file, configure the lookup filter property like this:
<property name="lookupFilterName" display-name-key="Lookup FilterName" description-key="Lookup FilterName" of-type="Lookup.Simple" usage="input" required="false" />
Note: It’s essential to update the ManifestTypes.d.ts file after adding the code by running the command npm run build. This step ensures that your PCF component correctly recognizes and utilizes the newly added property.
Step 3: Implement the Filtering Logic
Open index.ts and add a property named newFilterId. Set it in the public init method of your PCF control when a parameter named lookupFilterName changes. Here’s the code to implement this:
if (context.parameters.lookupFilterName.raw != null) {
    this.newFilterId = context.parameters.lookupFilterName.raw[0].id;
}
This code checks if the lookupFilterName parameter is not null and then assigns the id property of the first item in the raw array to the newFilterId property.

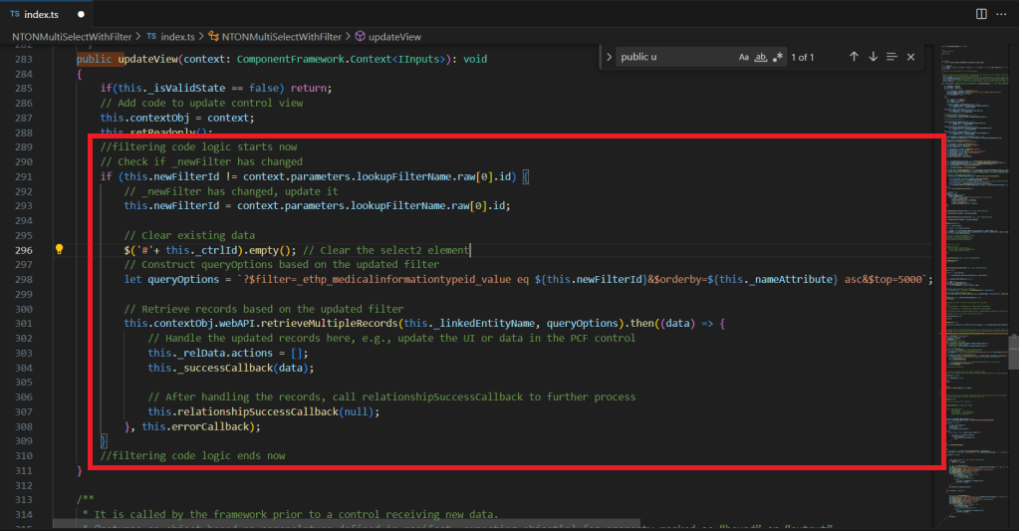
Later, in the public updateView method, there’s logic to check if newFilterId has changed:
if (this.newFilterId != context.parameters.lookupFilterName.raw[0].id) {
    // Update _newFilterId
    this.newFilterId = context.parameters.lookupFilterName.raw[0].id;

    // Clear existing data
    $('#' + this._ctrlId).empty(); // Clear the Select2 element

    // Construct queryOptions based on the updated filter
    const queryOptions = `?$filter=_ethp_medicalinformationtypeid_value eq ${this.newFilterId}&$orderby=${this._nameAttribute} asc&$top=5000`;

    // Retrieve records based on the updated filter
    this.contextObj.webAPI.retrieveMultipleRecords(this._linkedEntityName, queryOptions).then((data) => {
        // Handle the updated records here, e.g., update the UI or data in the PCF control
        this._relData.actions = [];
        this._successCallback(data);

        // After handling the records, call relationshipSuccessCallback to further process
        this.relationshipSuccessCallback(null);
    }, this.errorCallback);
}
This code monitors changes in the lookupFilterName parameter. If there’s a difference between the current newFilterId and the new lookupFilterName value, it updates newFilterId, clears existing data, and retrieves records based on the updated filter. This dynamic filtering ensures your control adapts correctly when the lookup filter changes.
Step 4: Creating a Solution Package
With your PCF control built, it’s essential to package it correctly. Open the terminal, change the directory into the solution folder, and run the following command to create a solution package for your PCF control:
pac solution init --publisher-prefix your_prefix --publisher-name your_name
Replace your_prefix and your_name with the appropriate publisher prefix and publisher name.
Step 5: Adding the PCF Control to the Solution
With your PCF control built, it’s essential to package it correctly. Open the terminal, change the directory into the solution folder, and run the following command to create a solution package for your PCF control:
pac solution add-reference --path ./your_control_folder
Replace your_control_folder with the actual folder path where your PCF control is located.
step 6: Build the solution Zip File
Open the Visual Studio developer command prompt and change the directory into the solution folder. Run the following command to build the solution zip file:
msbuild /t:build /restoreGitHub Repository
Visit our GitHub repository GitHub Link to access the enhanced N:N Multi-Select PCF control with filtering.
Conclusion
Enhancing the N:N Multi-Select PCF control with filtering opens up new possibilities for creating interactive and user-friendly interfaces in Model-Driven Power Apps. By providing users with the ability to filter their selections, you can streamline their workflow and improve the overall experience.
We invite you to explore our GitHub repository, experiment with the modified control, and customize it to meet your specific requirements. This level of customization can substantially enhance the functionality of your Power Apps, making them more powerful and efficient.
We hope this blog post has provided you with valuable insights and guidance in your journey to enhance N:N Multi-Select controls in Model-Driven Power Apps. Should you have any questions or encounter any challenges, please don’t hesitate to reach out. We’re here to support you every step of the way.
