

In Dynamics 365, it very common that a larger number of records need to be approved or a similar action need to be done. In these scenarios going to each record and performing the necessary action will not be a better option. To tackle these situations, custom buttons can be used. After selecting the records and on a single click in the custom button, the required action can be performed on all selected records.
In this blog we will go through two aspects, one is adding a custom button and the other is calling Jscript on clicking the button.
1.Adding a custom button in the form.
A third-party tool called Ribbon Workbench is used to setup a custom button within Model Driven app. To know how to add Ribbon Workbench please go through and follow the steps given in the link below.
Link: Ribbon Workbench
Once the Ribbon Workbench solution is added, create a new solution and add the table with the form on which we need to add the custom button. Keep the solution light by avoiding metadata and other components.
Click on the Ribbon Workbench icon from the solutions window as shown in Fig.1.

Now the Ribbon Workbench tool will open and ask for the solution to be customized. Select the appropriate solution and click on ok.

The custom button can be added in three areas namely Home, SubGrid and Form. In our case we need to update multiple record on button click. In that case, placing the button in the Form will be the better option.
Select the entity, drag the button from the Toolbox area and drop it to Form area.

Now in the Command section, add the action. Select the web resource, function name and parameters. Since we need to update multiple records on button click, the parameter should be set as SelectedControlSelectedItemIds.

Now, in order to ensure that at least one record is selected, add SelectionCountRule and set minimum value to 1. Add the newly created rule to the command section.

In the Button Section, add label, description and the select the command which we created from the dropdown list.

Now click on the publish button on the top.

Once the publishing is done, the button should show in the app.
2. JScript for updating multiple records on clicking the button.
After selecting the records and on clicking the custom button, the ‘Received ?’ field will be set to ‘Yes’,
Use the code given below:-

We are providing the web resource with the above Jscript in the command section of the button in Ribbon Workbench.
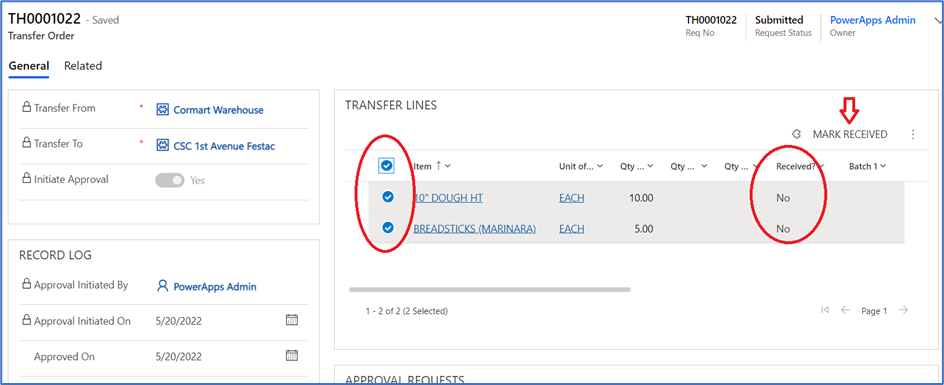
Form the above figure (Fig.8), it is clear that the name of our button is Mark Received. As rule is enabled, the button will be visible only on the selection of at least one record. Once one or more records are selected, the button will be visible. We can see that currently the Received field is holding a value ‘No’. On clicking the button, the selected record Received field will get updated to ’Yes’. See Fig.9

Hope this helps!
