

Automating internal processes and providing quick answers to employees is now easier with Microsoft Copilot Studio. In this guide, we’ll walk through creating a Copilot agent that can create employee records in Dataverse (CRM) and answer FAQs from a SharePoint library containing multiple files.
This post focuses on building the agent itself, integrating it with Power Automate, and configuring topics and tools for a professional internal assistant.
Prerequisites
To follow this guide, you’ll need:
| Prerequisite | Purpose |
|---|---|
| Microsoft Copilot Studio | Build, configure, and publish the chatbot agent |
| Power Automate | Execute flows for creating records in Dataverse |
| Microsoft Dataverse | Store employee records |
| SharePoint library | Host files (Excel, Word, PDF, PPT, Text) |
| User license with publishing rights | Allows you to publish the agent so it can be used by end users in your organization |
Publishing the agent enables your team to access it directly via Microsoft Teams, Outlook, or embedded Power Platform channels, providing real-time automation and knowledge delivery.
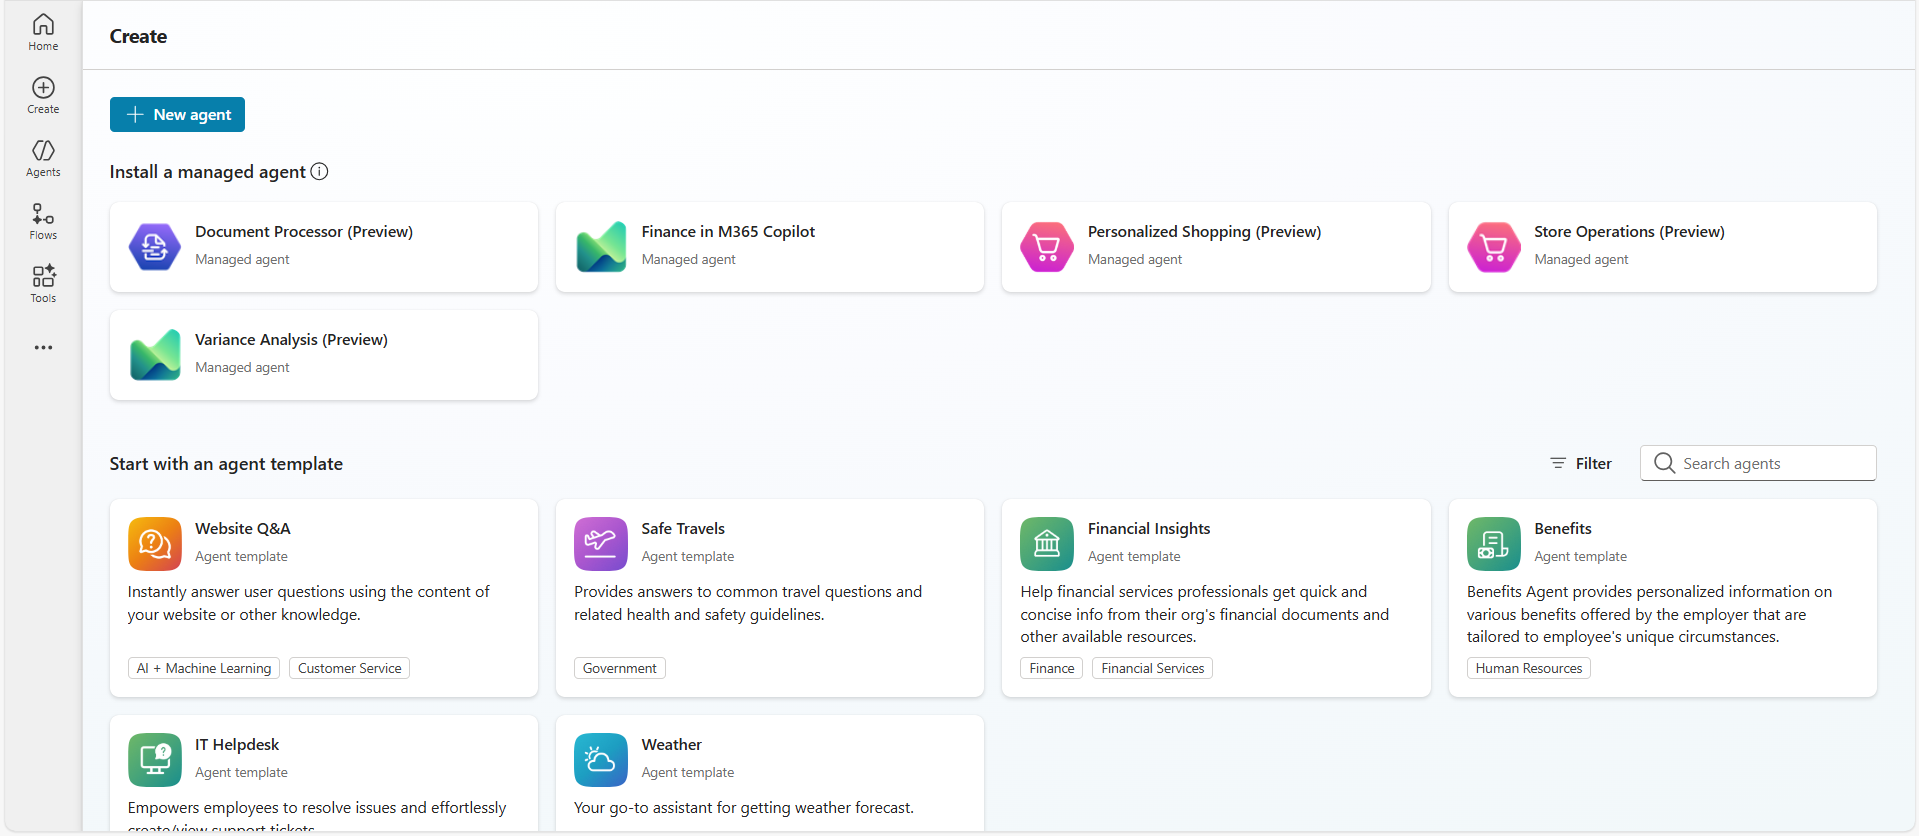
Step 1 — Creating a New Agent
- Open Microsoft Copilot Studio and click + New agent.
This launches the creation wizard.
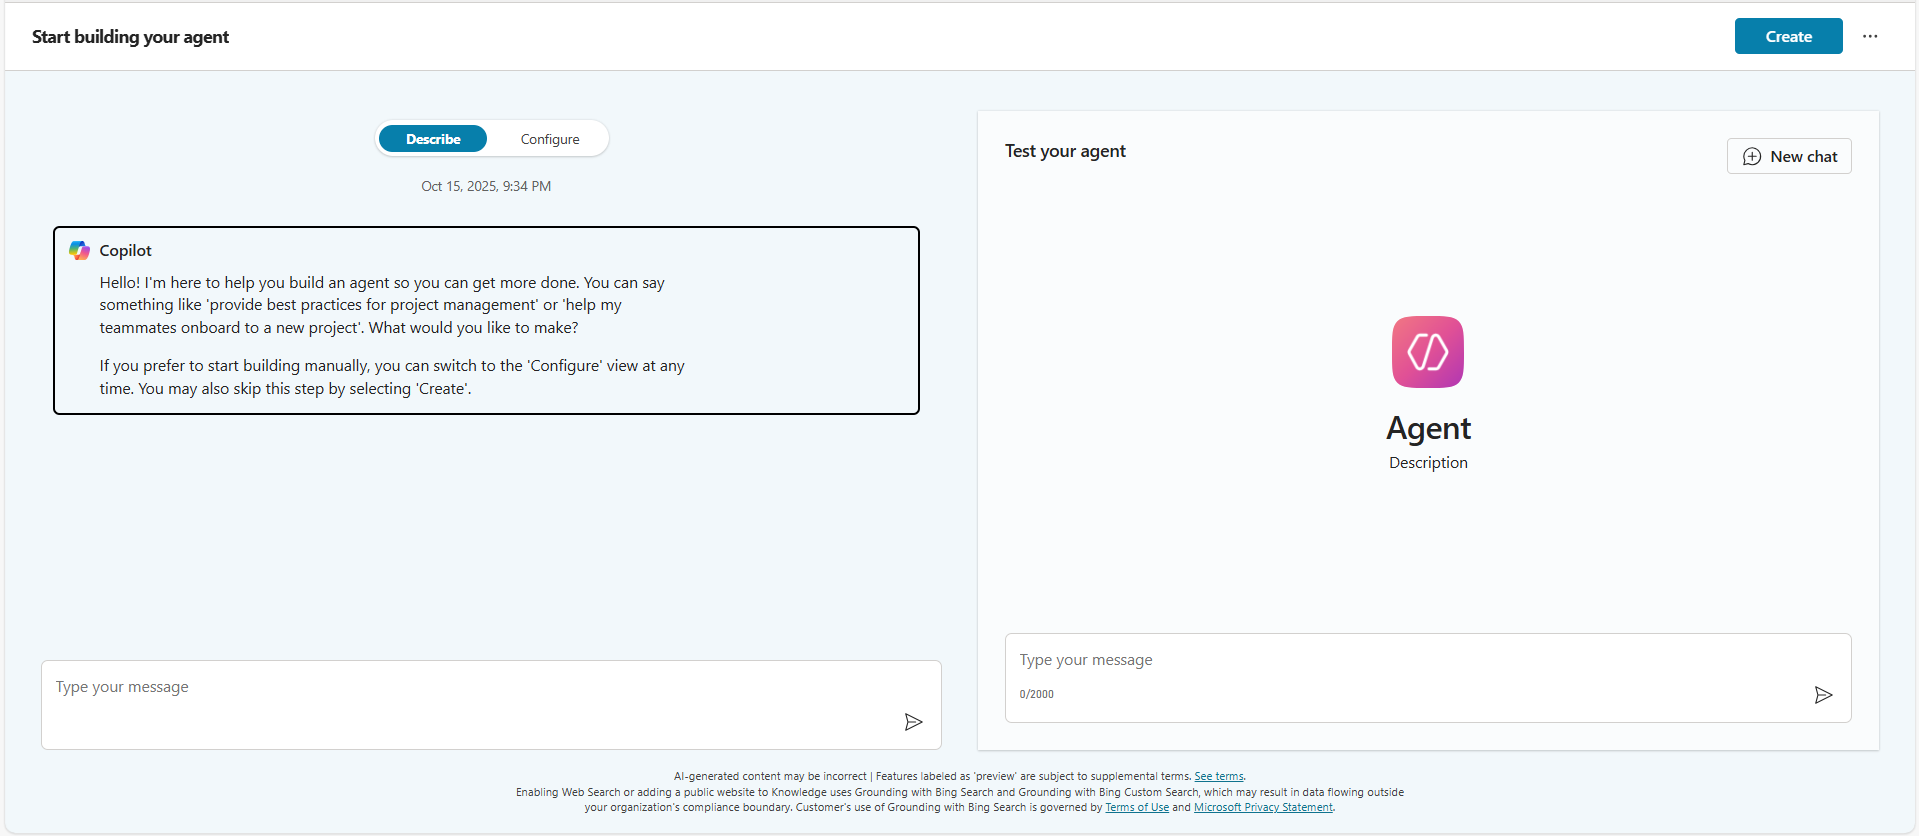
- You’ll now see a Copilot assistant on the Describe tab.
The Copilot greets you and helps generate an agent description. You can either:- Type what kind of agent you want to create (e.g., “an agent that helps create employee records and answers work-related questions”), or
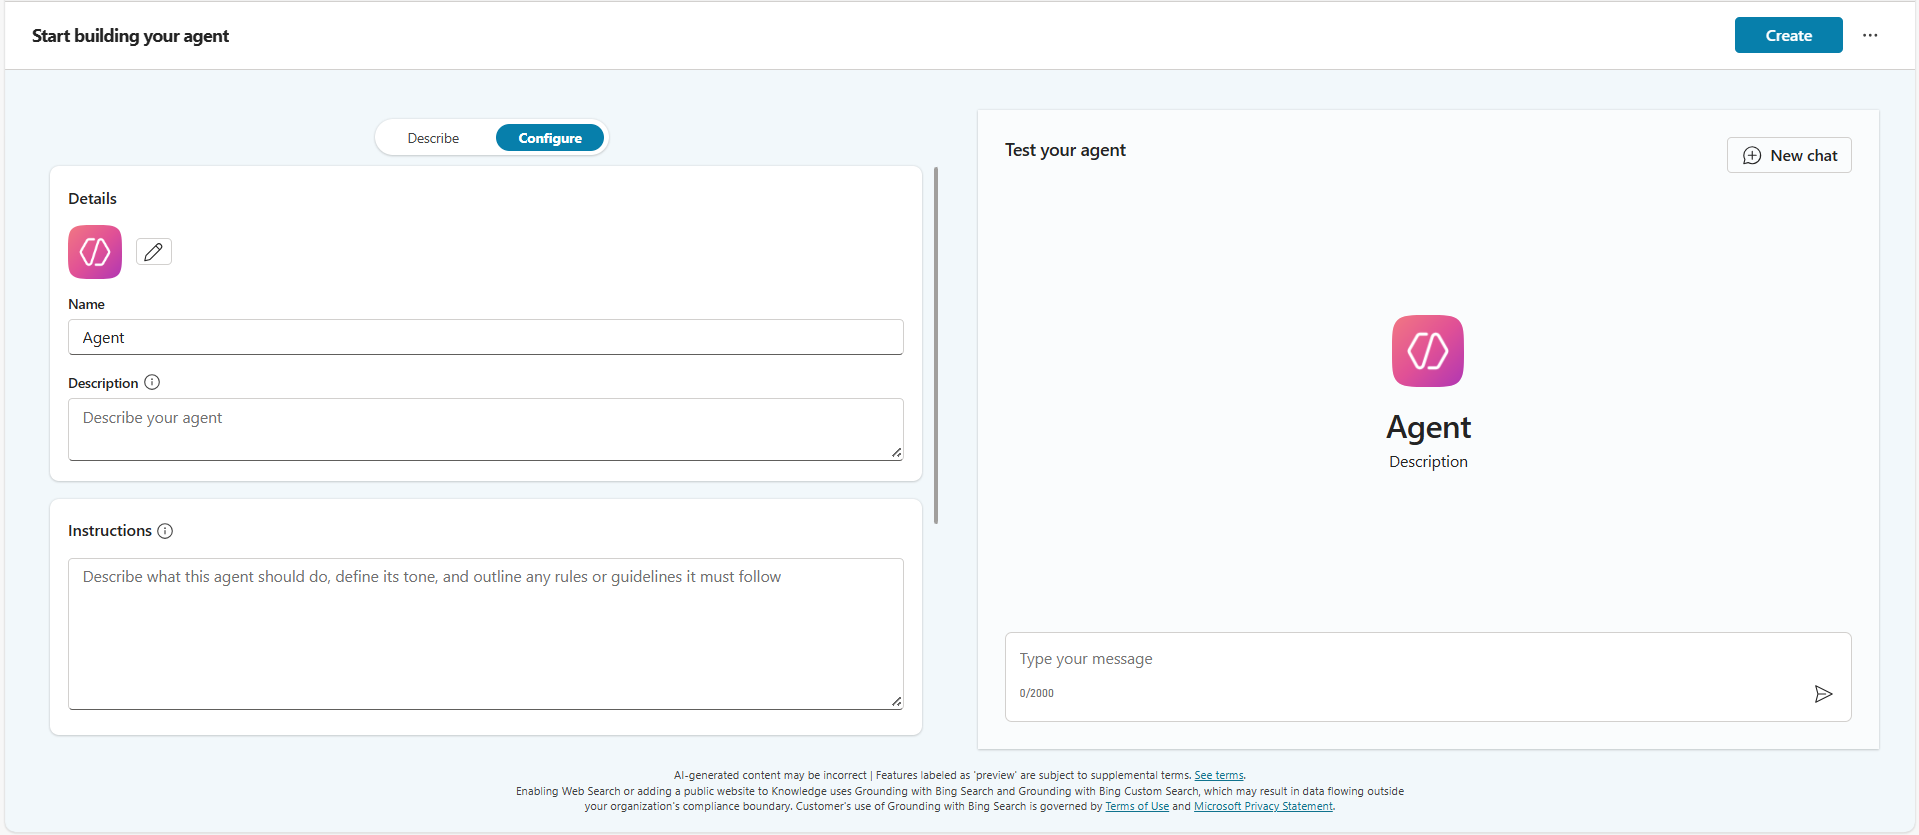
- Skip this step and switch to the Configure tab to define everything manually.
- In the Configure tab, manually fill in:
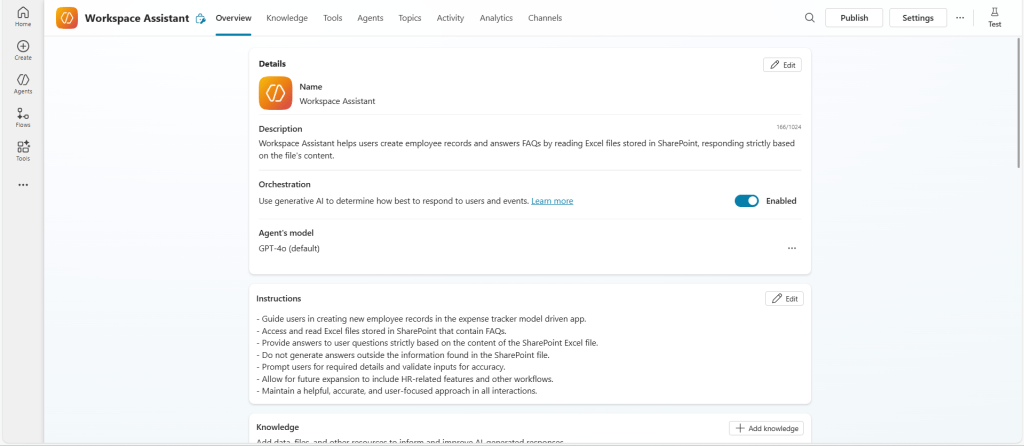
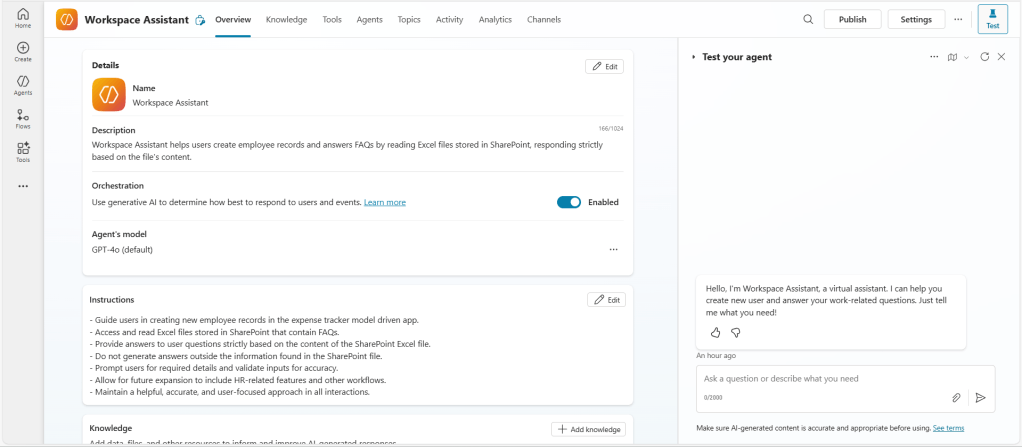
- Name: Workspace Assistant
- Description: Helps create employee records and answer work-related FAQs
- Instructions: Define the agent’s tone, boundaries, and behavior
- After creation, you’ll land on the Agent Overview Page, which includes:
- Overview
- Topics
- Knowledge
- Tools
- Channels etc.
Step 2 — Adding Knowledge (SharePoint Library)
To make your agent answer FAQs, you can connect structured content from multiple files in a SharePoint library:
- Excel (.xlsx)
- Word (.docx)
- PDF (.pdf)
- PowerPoint (.pptx)
- Text (.txt)
Add the SharePoint Library
- Go to the Knowledge tab.
- Click + Add knowledge → Select your SharePoint library containing FAQ file.

To ensure answers come only from your library:
- Go to the Overview tab, then scroll down to the Knowledge section.
- Disable Web Search.
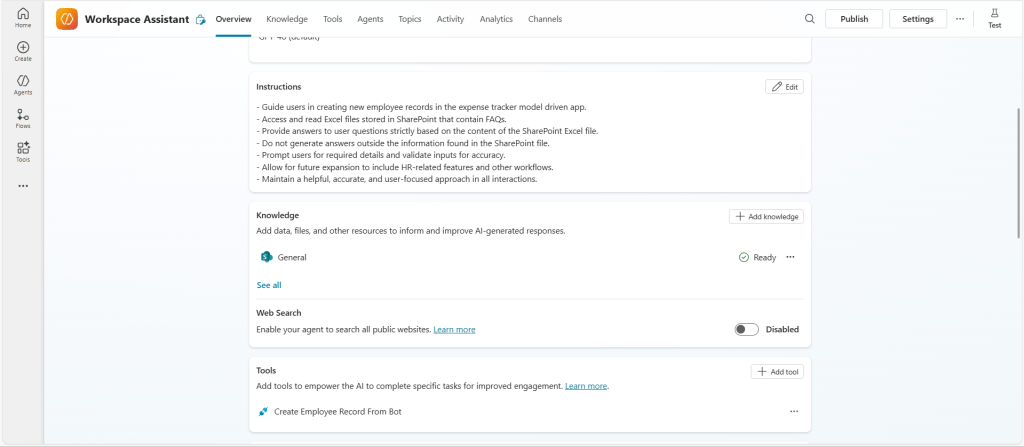
This ensures the bot gives responses strictly based on the content in the file you added.
Step 3 — Creating the “Add New Employee” Topic
In Copilot Studio, topics are conversational flows that define how the bot responds to user input.
There are two types of topics:
System topics: Built-in topics like Conversation Start, Escalate, and End Conversation. These handle default behaviors such as greetings and fallback responses.
Custom topics: User-defined flows that handle specific tasks or scenarios.
- Open the Topics tab → Click + New topic.
- Name it Add New Employee.
Trigger Setup
- Trigger type: Agent chooses
- Trigger phrases:
- “create employee”
- “add new user”
- “start onboarding”

When the user enters any of these trigger phrases, the Add New Employee topic automatically starts running. This allows the bot to begin collecting employee details without manual selection.
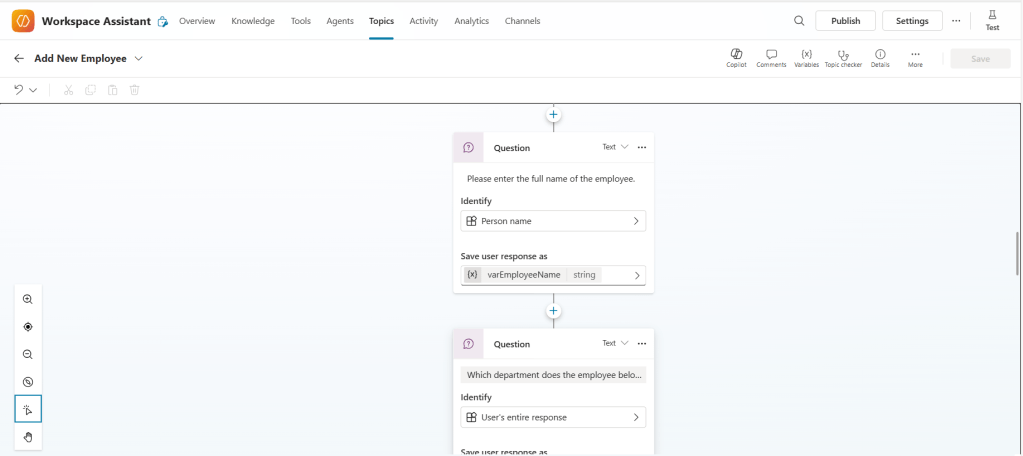
Question Nodes
Add question nodes to collect the following details:
- Full name →
varEmployeeName - Department →
varDepartment - Email →
varEmail - Phone number →
varPhoneNumber
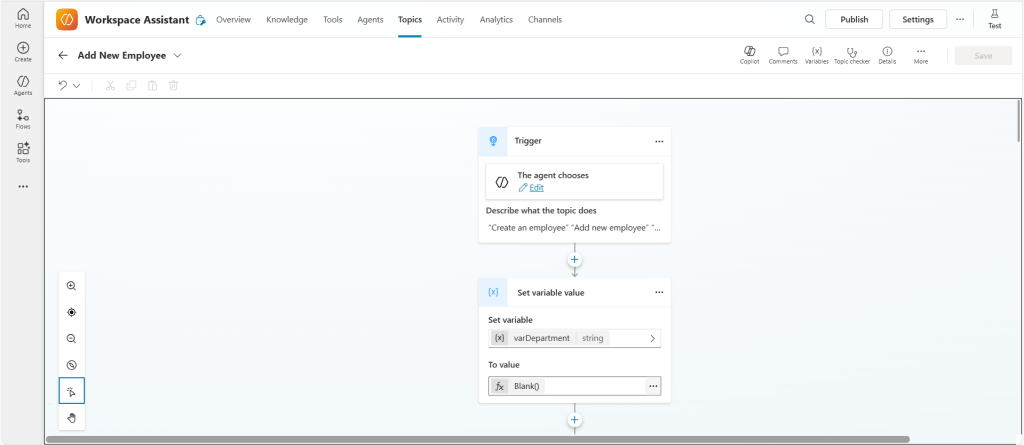
To prevent reuse of old values during looping, all variables are initialized as blank using Set Variable nodes before restarting the topic. I also configured each question node to ask every time by disabling the “Skip if already answered” option in node properties. This ensures fresh input is collected during each loop.
Step 4 — Creating and Connecting a Power Automate Flow
To save employee data in Dataverse: You can create the cloud flow directly inside Copilot Studio or in Power Automate separately.
Option 1 — Inside Copilot Studio:
- Go to the Tools tab → click + Add new tool → select + New tool → Agent flow.
- This opens the Power Automate interface within Copilot Studio.
- Create an Instant Cloud Flow.
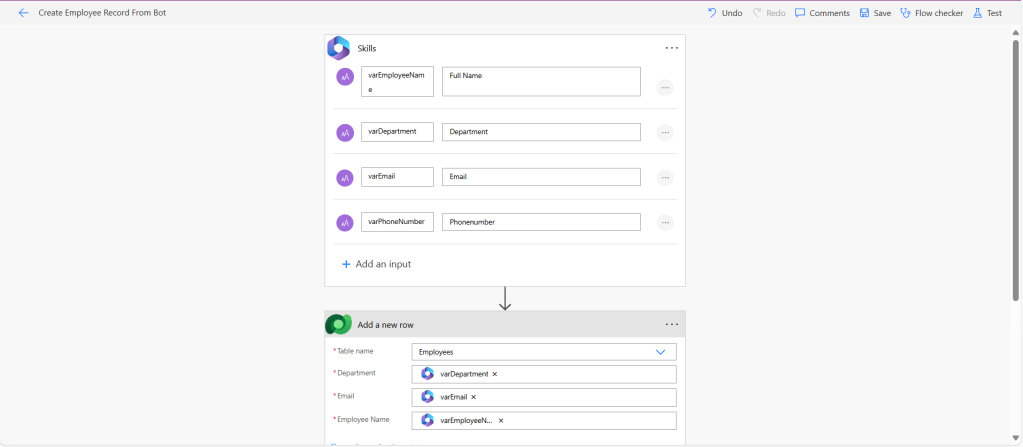
- Trigger: When an agent calls the flow.
- Add input fields: Full Name, Department, Email, Phone Number.
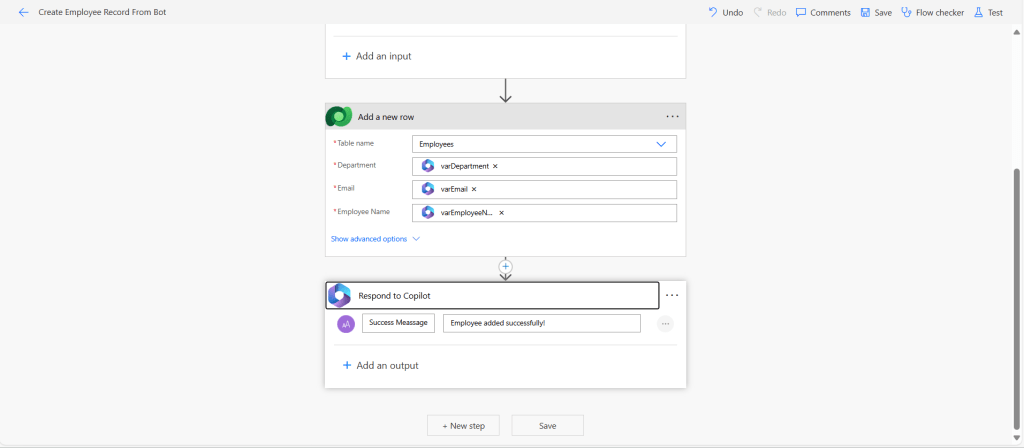
- Add Add a new row action → target your Dataverse Employee table.
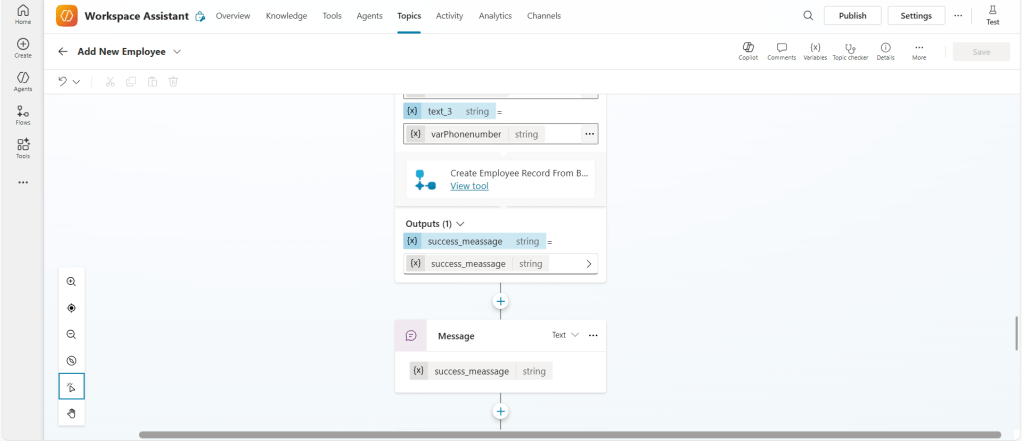
- Add Respond to Copilot → send a success message back to the agent.
Option 2 — In Power Automate separately:
- Create an Instant Cloud Flow.
- Follow steps 4–7 as above.
Step 5 — Adding the Flow as a Tool
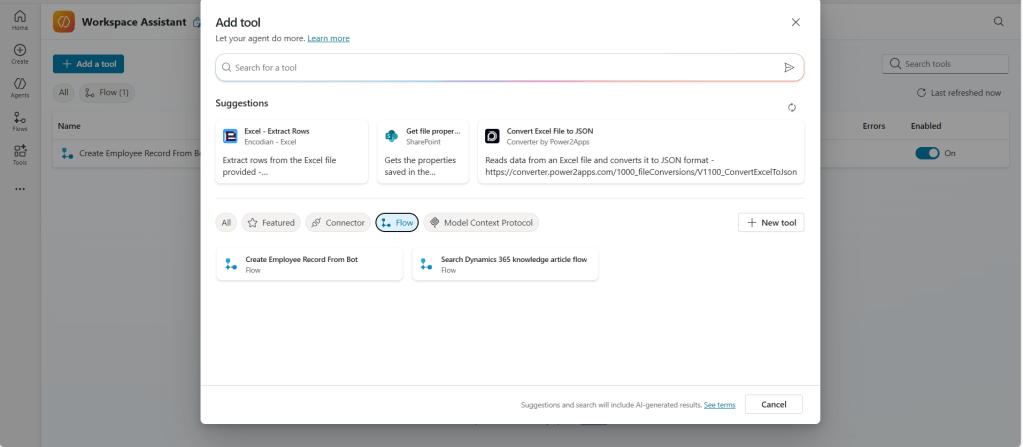
- Go to the Tools tab → Click + Add new tool.
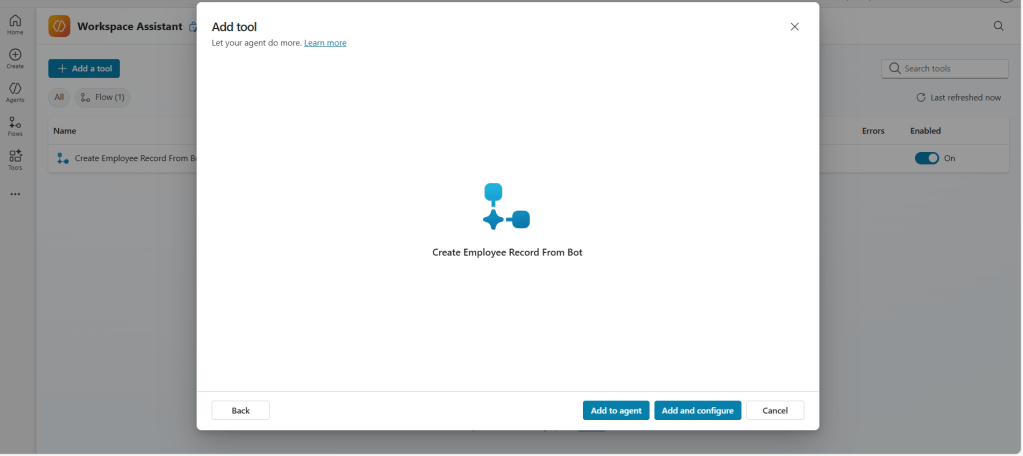
- Select your flow from the Flows section → Click Add and configure.
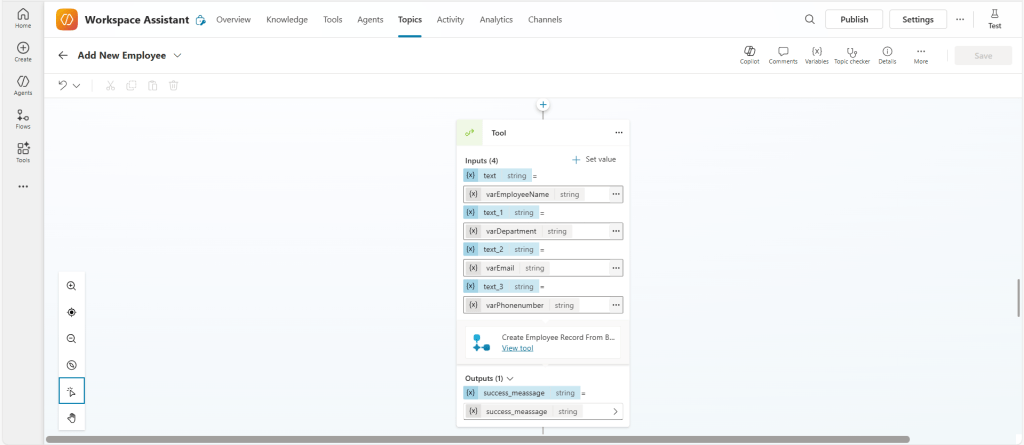
- In the Add New Employee topic:
- Insert a Tool node.
- Select the flow.
- Map topic variables to flow inputs.
- Add a Message node to display the success message returned by the flow.
Step 6: Adding a Condition for Repeating the Process
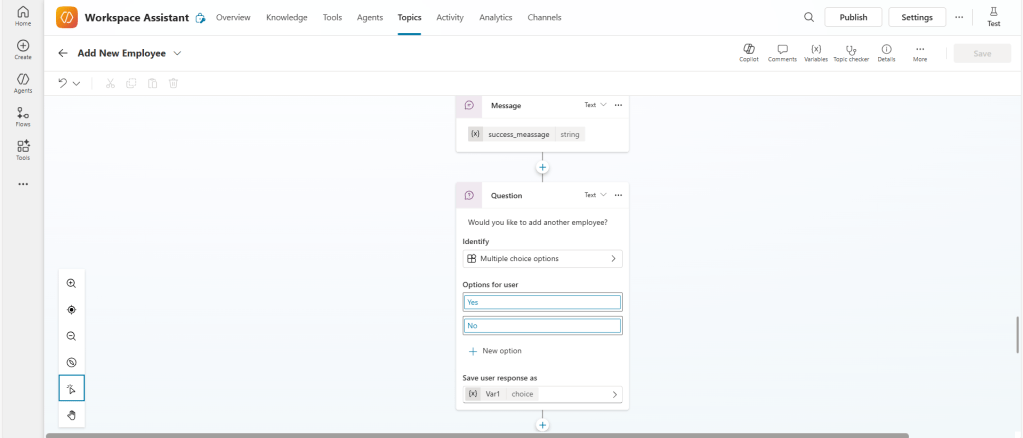
After adding an employee, I added a question node to ask: Would you like to add another employee?
- The question node uses Multiple Choice input type with options:
- Yes
- No
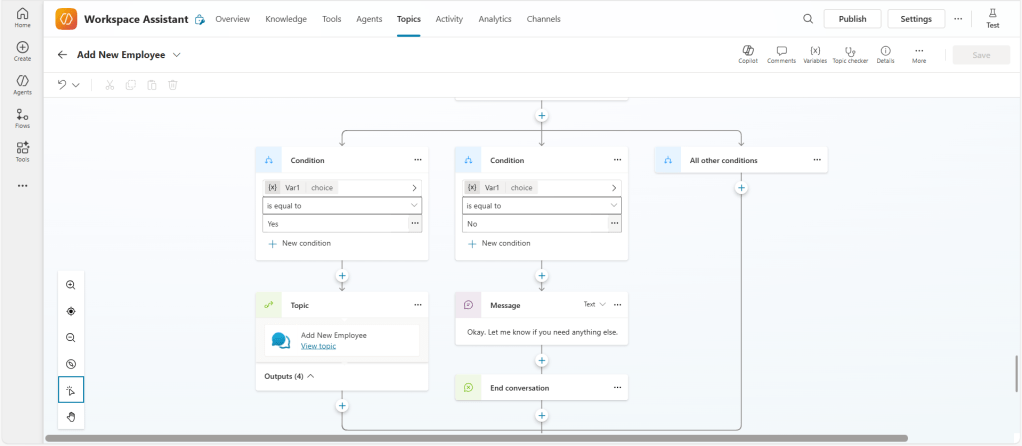
Then I added a Condition node:
- If Yes → Bot calls the Add New Employee topic again
- If No → Bot responds:
“Okay. Let me know if you need anything else.”
Then triggers an End Conversation node
Use the Test Pane in Copilot Studio to test the bot’s behavior and validate the full conversation flow. You’ll also notice an introductory message when the bot starts — this comes from the default Conversation Start topic configured in the agent. You can customize this topic to change the welcome message or add initial logic as needed.
Final Output (Sample Conversation)
User: Add new employee
Bot: Please provide the employee’s full name.
User: John Miller
Bot: Which department?
User: Marketing
Bot: Employee record created successfully!
Bot: Would you like to add another employee?
Tips & Recommendations
- Use the Test Pane to validate topic logic, variable flow, and conversation branching.
- Ensure your Power Automate flow and Copilot agent are in the same environment to avoid integration issues.
- Keep the SharePoint library updated to ensure the bot always responds with the latest data.
- Limit Dataverse table permissions to protect sensitive employee information.
- Expand the agent later to support additional use cases like:
- Leave requests
- Ticket logging
- Approval workflows
Conclusion
Building a Copilot agent in Microsoft Copilot Studio is straightforward with the right structure — Knowledge, Topics, Tools. Publishing the agent allows your team to use it directly in Teams, Outlook, or embedded Power Platform channels, enabling real-time automation and knowledge delivery.
Try creating your own agent using this guide and explore automating other internal processes to improve workplace efficiency.
