

Welcome to this step-by-step guide on building a simple Canvas App called “INCIDENTS HUB” using Microsoft PowerApps. The INCIDENTS HUB app will help users track and manage incidents efficiently, offering an easy-to-use interface for viewing, adding, and updating incident records.
Prerequisites
- An active Microsoft PowerApps account.
- Basic understanding of PowerApps interface and functions.
- A data source (e.g., SharePoint list, Excel, Dataverse) containing your incident data.
Step 1: Create a New Mobile Canvas App
- Open PowerApps: Go to PowerApps and sign in with your Microsoft account.
- Start from Blank: Click on “Create” from the left navigation pane, then select “Canvas app from blank”.
- Name Your App: Enter “INCIDENTS HUB” as the name of your app and select “Phone” for the format.
- Create: Click “Create” to start building your app.
Step 2: Connect to Your Data Source
- Add Data Source: Click on the “Data” icon in the left pane, then click on “Add data”.
- Select Your Data Source: Choose your data source (e.g., SharePoint, Excel, Dataverse) and connect to the table or list that contains your incident records.
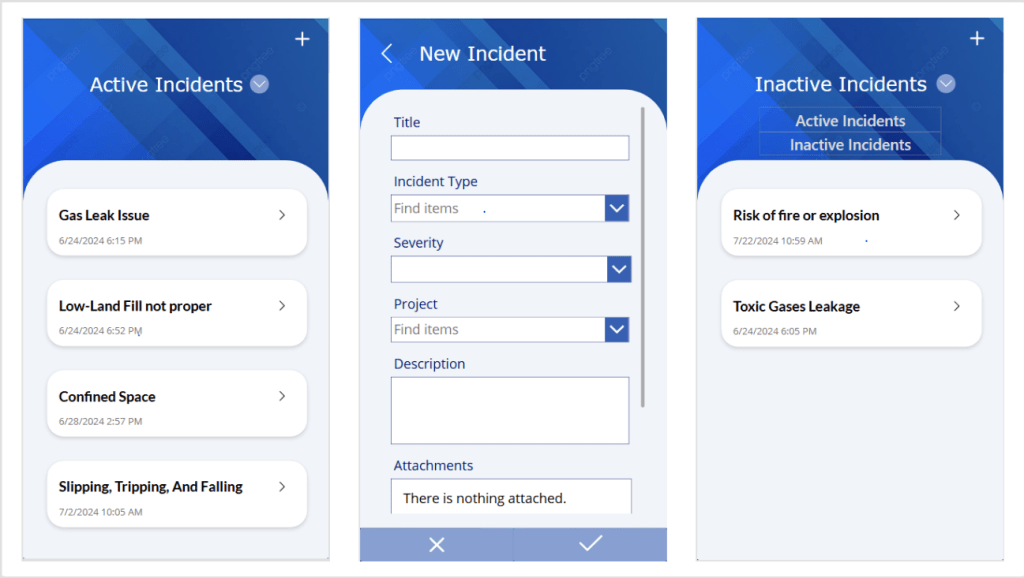
Step 3: Design the Active Incidents Screen (Default Screen)

- Active Incidents Screen Layout:
- Rename “Screen1” to “ActiveIncidentsScreen”.
- Add a Rectangle control at the top for the header background.
- Add a Label control on top of the rectangle. Set its Text property to “Active Incidents”.
- Add an Icon control (plus icon) at the top-right corner for adding new incidents.
- Add a Gallery Control:
- Insert a Vertical Gallery control to display a list of incidents.
- Set the Items property of the Gallery to:
Filter(Incidents, 'Incidents (Views)'.'Active Incidents')
- Configure Gallery Layout:
- Select the Gallery control.
- Choose a suitable layout (e.g., Title and Subtitle).
- Add Text Labels to display incident title and date:
Title: ThisItem.TitleDate: ThisItem.'Created On'
- Add an Icon control (right arrow) to navigate to incident details.
Step 4: Design the Inactive Incidents Screen
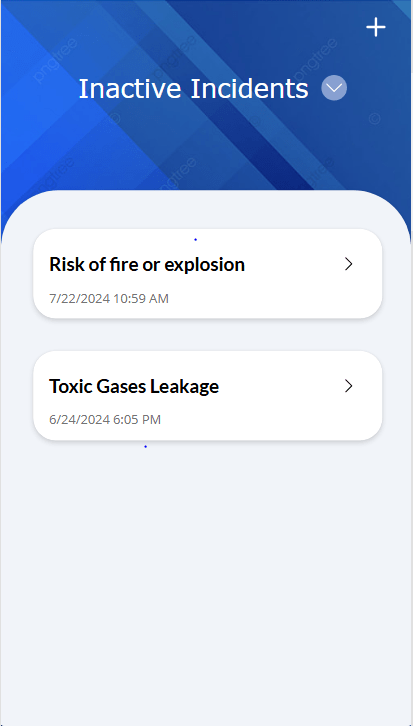
- Inactive Incidents Screen Layout:
- Rename the screen name to “InactiveIncidentsScreen”.
- Add a Rectangle control at the top for the header background.
- Add a Label control on top of the rectangle. Set its Text property to “Inactive Incidents”.
- Add an Icon control (plus icon) at the top-right corner for adding new incidents.
- Add a Gallery Control:
- Insert a Vertical Gallery control to display a list of incidents.
- Set the Items property of the Gallery to:
Filter(Incidents, 'Incidents (Views)'.'Inactive Incidents')
- Configure Gallery Layout:
- Select the Gallery control.
- Choose a suitable layout (e.g., Title and Subtitle).
- Add Text Labels to display incident title and date:
Title: ThisItem.TitleDate: ThisItem.'Created On'
- Add an Icon control (right arrow) to navigate to incident details.
- Add Navigation
- Set the OnSelect property of the right arrow icon to navigate to “EditIncidentScreen”:
ResetForm(CreateIncidentForm); Set(screen,2); Set(varFormData,ThisItem); Set(varFormMode, FormMode.Edit); Navigate(EditScreen, ScreenTransition.Fade);
- Set the OnSelect property of the right arrow icon to navigate to “EditIncidentScreen”:
- Add New Incident Button:
- Set the OnSelect property of the “+” icon to navigate to “CreateIncidentScreen”:
ResetForm(CreateIncidentForm); Navigate(CreateIncidentScreen); Set(screen,2); Set(varFormData,ThisItem); Set(varFormMode, FormMode.Edit); Navigate(EditScreen, ScreenTransition.Fade);
- Set the OnSelect property of the “+” icon to navigate to “CreateIncidentScreen”:
- Add New Incident Button:
- Set the OnSelect property of the “+” icon to navigate to “CreateIncidentScreen”:
ResetForm(CreateIncidentForm); Navigate(CreateIncidentScreen, ScreenTransition.Fade);
- Set the OnSelect property of the “+” icon to navigate to “CreateIncidentScreen”:
Step 5: Design the Create Incident Screen
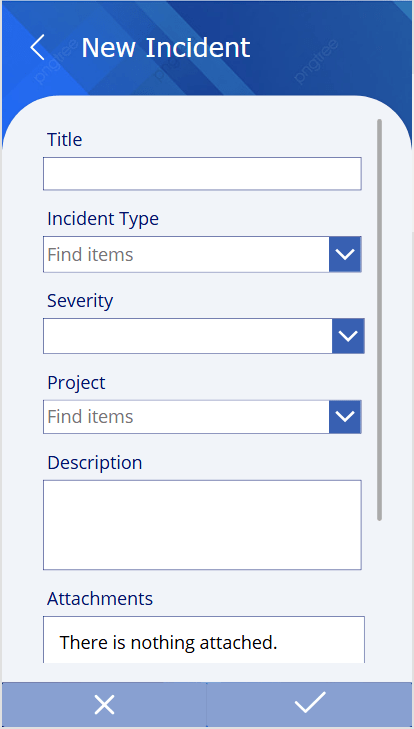
The “Add Incident” screen allows users to input new incident details. Here’s how to set it up:
- Add a New Screen:
- Click on “New Screen” and select “Blank”.
- Rename this screen to “CreateIncidentScreen”.
- Add Header Elements:
- Label: Add a Label control at the top. Set its Text property to “New Incident”.
- Back Icon: Add a Back Arrow icon to navigate back to the Home Screen. Set its OnSelect property to:
Navigate(ActiveIncidentsScreen, ScreenTransition.Fade)
- Insert an Edit Form Control:
- Insert an Edit Form control to collect incident details.
- Set the DataSource property to your incidents data source, e.g., Incidents
- Set the DefaultMode property of the form to FormMode.New.
- Add Form Fields:
- In the Edit Form control, select and arrange the necessary fields for the incident, such as:
- Title
- Incident
- Type
- Severity
- Project
- Description
- Attachments
- In the Edit Form control, select and arrange the necessary fields for the incident, such as:
- Configure the Form Layout:
- Use the Form’s Properties pane to set the layout and arrange the fields as shown in your image
- Add Submit and Cancel Buttons:
- Add two buttons at the bottom of the screen for submitting and canceling the form:
- Submit Button: Add a Checkmark icon button to save the new incident. Set its OnSelect property to:
Patch(Incidents,Defaults(Incidents),CreateIncidentForm.Updates); Navigate(ActiveIncidentsScreen,ScreenTransition.Fade);
- Cancel Button: Add a Cancel (Cross) icon button to reset the form and return to the Home Screen. Set its OnSelect property to:
Navigate(ActiveIncidentsScreen, ScreenTransition.Fade)
Step 6: Implement the Dropdown Toggle for Incident Status
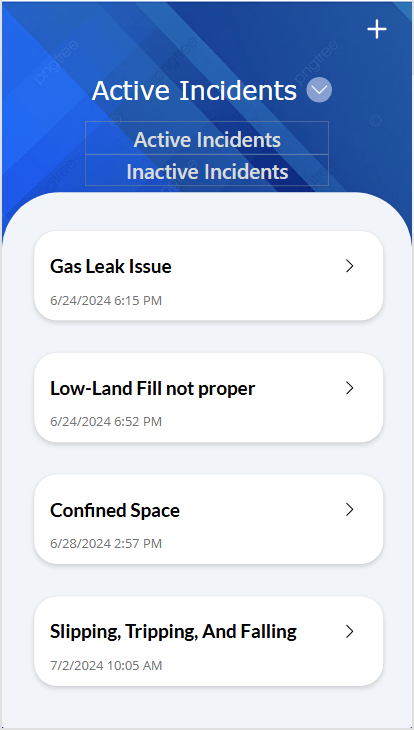
- Add a Chevron Icon for Dropdown:
- Insert a ChevronDown icon next to the “Active Incidents” and “Inactive Incidents” label in ActiveIncidentsScreen and InactiveIncidentsScreen respectively.
- Set the OnSelect property of the ChevronDown icon to toggle the visibility of the Dropdown control:
Set(vardropdown, !vardropdown)
- Add a Dropdown Control:
- On the “ActiveIncidentsScreen” and “InactiveIncidentsScreen”, add a Dropdown control for toggling between “Active Incidents” and “Inactive Incidents”.
- Rename the Dropdown control to DropdownContainer.
- Set the ‘visible’ property of the DropdownContainer to ‘vardropdown’.
Step 8: Create and Design the Edit Incident Screen

The “Edit Incident” screen allows users to update existing incident details. Here’s how to set it up:
- Add a New Screen:
- Click on “New Screen” and select “Blank”.
- Rename this screen to “EditIncidentScreen”.
- Add Header Elements:
- Label: Add a Label control at the top. Set its Text property to “Edit Incident”.
- Back Icon: Add a Back Arrow icon to navigate back to the Home Screen. Set its OnSelect property to:
Navigate(HomeScreen, ScreenTransition.Fade)
- Insert an Edit Form Control:
- Insert an Edit Form control to update incident details.
- Set the DataSource property to your incidents data source, e.g., Incidents.
- Set the Item property of the form to varFormData and DefaultMode to varFormMode
- Add Form Fields:
- In the Edit Form control, select and arrange the necessary fields for the incident, such as:
- Title
- Incident
- Type
- Severity
- Project
- Description
- Attachments
- In the Edit Form control, select and arrange the necessary fields for the incident, such as:
- Configure the Form Layout:
- Use the Form’s Properties pane to set the layout and arrange the fields as shown in your image.
- Add Save and Cancel Buttons:
- Save Button: Add a Checkmark icon button to save the updated incident. Set its OnSelect property to:
Patch(Incidents,varFormData,EditIncidentForm.Updates); If(screen=1, Navigate(ActiveIncidentsScreen,ScreenTransition.Fade), Navigate(InactiveIncidentsScreen,ScreenTransition.Fade));
- Cancel Button: Add a Cancel (Cross) icon button to reset the form and return to the Home Screen without saving changes. Set its OnSelect property to:
If(screen=1, Navigate(ActiveIncidentsScreen), Navigate(InactiveIncidentsScreen));
- Save Button: Add a Checkmark icon button to save the updated incident. Set its OnSelect property to:
