

In today’s fast-paced business world, real-time communication is essential. In this guide, I’ll show you how I built a fully automated employee onboarding notification system using Adaptive Cards and Power Automate. When a new employee is added in Dataverse, the system automatically sends an Outlook notification with their details and a direct link to view the full employee directory in CRM — including the newly added record.
To ensure the Adaptive Card rendered properly in Outlook, I registered myself as a test user using the Outlook Actionable Messages Developer Dashboard.
Use Case
Automatically notify relevant users via Outlook when a new employee is added.
- Display the new employee’s Name, Email, and Department
- Include a View in CRM button to open CRM
- Eliminate the need for manual notification emails
Tools & Requirement
- Microsoft Power Automate
- Microsoft Dataverse
- Adaptive Card Designer
- Outlook Actionable Messages Developer Dashboard
- Send an email (V2) connector
- Registered test sender email address
Power Automate Flow Structure
- Trigger: When a new row is added in Dataverse (Employee table)
- Build the CRM URL
- Compose Adaptive Card JSON
- Send an email with Adaptive Card
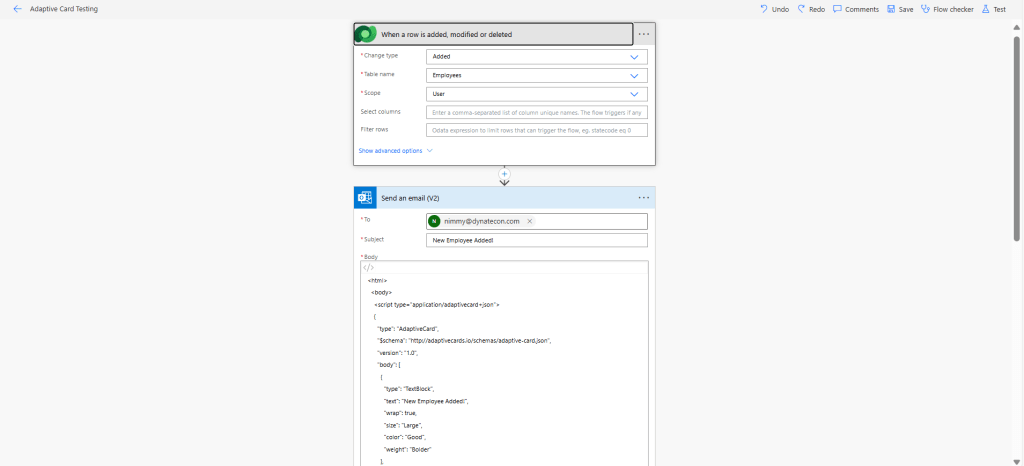
[Screenshot 1: Power Automate Flow Overview]
Building the CRM Link
The CRM URL to open the employee record is built like this:
https://<yourorg>.crm<region>.dynamics.com/main.aspx?appid=<AppId>&pagetype=entitylist&etn=<EmployeeTableLogicalName>&viewid=<SystemViewGUID>&viewType=1039
Explanation of each parameter:
<yourorg>: Your Dynamics 365 environment name.<region>: Your region identifier.appid: The App ID of your Model-Driven App where the employee table exists.pagetype=entitylist: Opens the list view (instead of a single record).etn: The logical name of the employee table (e.g.,cr2c5_employee).viewid: The GUID of the specific system view you want to open (e.g., Active Employees).viewType=1039: Tells Dynamics to open the system view (1039 = system view type).
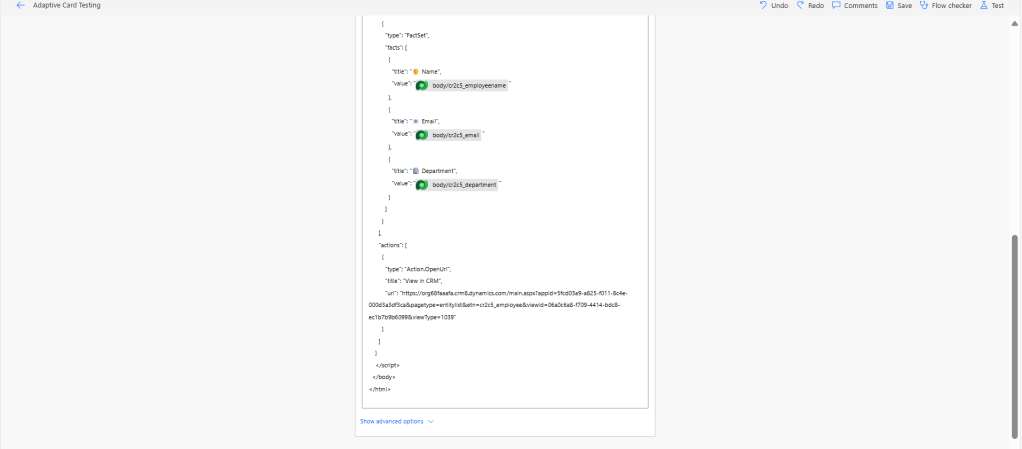
Adaptive Card JSON with CRM Button
This JSON was copied from Adaptive Card Designer — make sure the message body exactly matches what you tested in the designer.
   {
      "type": "AdaptiveCard",
      "$schema": "http://adaptivecards.io/schemas/adaptive-card.json",
      "version": "1.0",
      "body": [
        {
           "type": "TextBlock",
           "text": "New Employee Added!",
           "wrap": true,
           "weight": "Bolder",
           "size": "Large"
        },
        {
          "type": "FactSet",
          "facts": [
            {
              "title": "Name",
              "value": "@{triggerOutputs()?['body/cr2c5_employeename']}"
            },
            {
              "title": "Email",
              "value": "@{triggerOutputs()?['body/cr2c5_email']}"
            },
            {
              "title": "Department",
              "value": "@{triggerOutputs()?['body/cr2c5_department']}"
            }
          ]
        }
      ],
      "actions": [
        {
          "type": "Action.OpenUrl",
          "title": "View in CRM",
          "url": "https://<yourorg>.crm<region>.dynamics.com/main.aspx?appid=<AppId>&pagetype=entitylist&etn=<EmployeeTableLogicalName>&viewid=<SystemViewGUID>&viewType=1039"
        }
      ]
    }

[Screenshot 2: Adaptive Card JSON and Preview designed using Adaptive Card Designer — this same card payload is used in the Send an email (V2) action body.]
This helps ensure what you build in the designer is exactly what gets rendered in Outlook.
Sending the Adaptive Card via Email (Power Automate)
In Power Automate, use the Send an email (V2) action to deliver the Adaptive Card to a user’s Outlook inbox.
- Add a Send an email (V2) action.
- Set the To address to your test user’s email.
- Set a Subject like: New Employee Added.
- In the Body, paste the full Adaptive Card JSON.
- Set Is HTML to Yes.
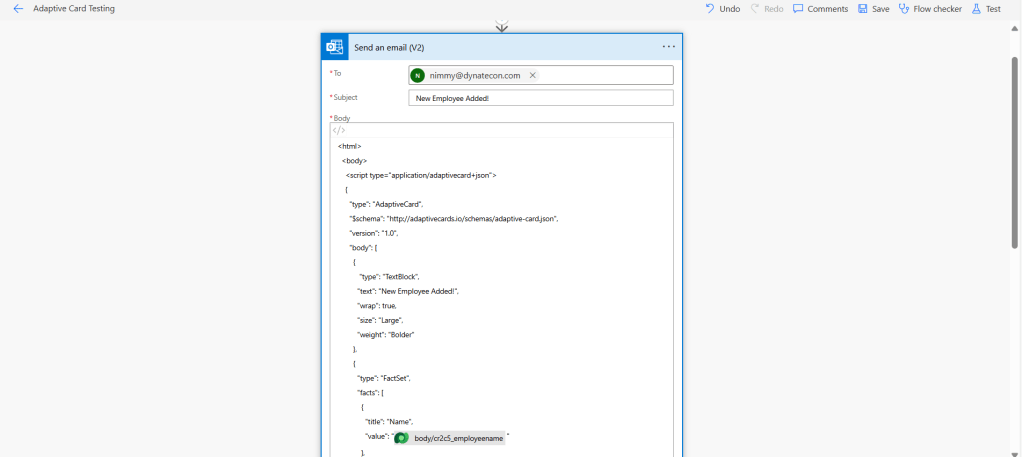

[Screenshot 3: Send an Email (V2) with Card JSON]
Configuring the Outlook Actionable Messages Developer Dashboard
To test Adaptive Cards in Outlook using the Send an email (V2) action in Power Automate, you must register your sender email and test user in the Actionable Email Developer Dashboard.
Step-by-Step: Add a New Provider
- Go to
https://outlook.office.com/connectors/oam/publish - Click
New Provider. - Fill the details:
- Friendly Name
A display name for your provider. This will appear in the dashboard for your reference. - Sender Email Address
The email address from which the Power Automate flow sends the email. This must match the From field in the Send an email (V2) action. - Test User Email Address
The email address of the user who will receive and interact with the Adaptive Card. This should be a user within the same tenant. - Logo
Must be a.png,.jpg, or.giffile and no larger than 60 KB.
- Friendly Name
- Scope of Submission
Select Test Users – This allows testing within your tenant without waiting for Microsoft approval. - Click Save
That’s it! Now your sender email and test user are registered for sending and receiving Actionable Messages via Power Automate.

[Screenshot 4: Developer Dashboard]
Adaptive Card Rendering in Outlook
Once the email is sent using the Send an email (V2) connector with Adaptive Card JSON in the body, Outlook will render the card like this:
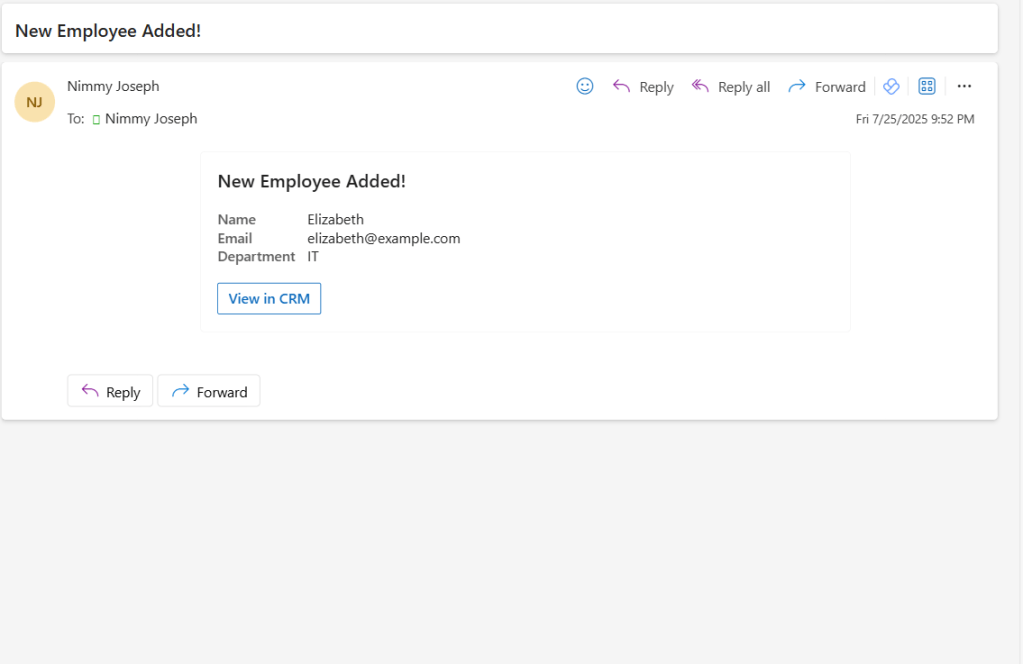
[Screenshot 5: Rendered Adaptive Card in Outlook]
This view lets recipients instantly see the new employee’s details and click View in CRM to open the full employee list — all within Outlook, without needing to open Power Automate or CRM manually.
Conclusion
By automating your employee onboarding alerts with Adaptive Cards, you eliminate repetitive manual emails and give your team immediate, actionable insights directly in Outlook. This method not only enhances internal communication but also provides a sleek, interactive way to stay updated with employee additions — right where your team works most.
References & Helpful Links
- Adaptive Cards Overview
Microsoft’s official guide to what Adaptive Cards are, how they work, and where they can be used.
https://learn.microsoft.com/en-us/adaptive-cards/ - Adaptive Card Designer
This is where I built and tested my card visually before using it in Power Automate.
https://adaptivecards.io/designer/ - Outlook Actionable Messages Documentation
Learn how Outlook handles Adaptive Cards and how to send them via email or connectors.
https://learn.microsoft.com/en-us/outlook/actionable-messages/send-via-email - Outlook Actionable Messages Developer Dashboard
Register test users and sender emails to preview cards properly in Outlook.
https://outlook.office.com/connectors/oam/publish
.
