
By reading this article, you would get answer to below questions related to Power Automate Flow:
- 📌 How to initiate flow in one Dynamic 365 instance from another Dynamics 365 instance?
- 📌 How to initiate Power Automate flow using Http request?
- 📌 How to remove user’s roles in an instance (and triggered from another instance)?
- 📌 How to get records using FetchXML in Power Automate Flow?
- 📌 How to disassociate (or associate) relationship records in Power Automate Flow?
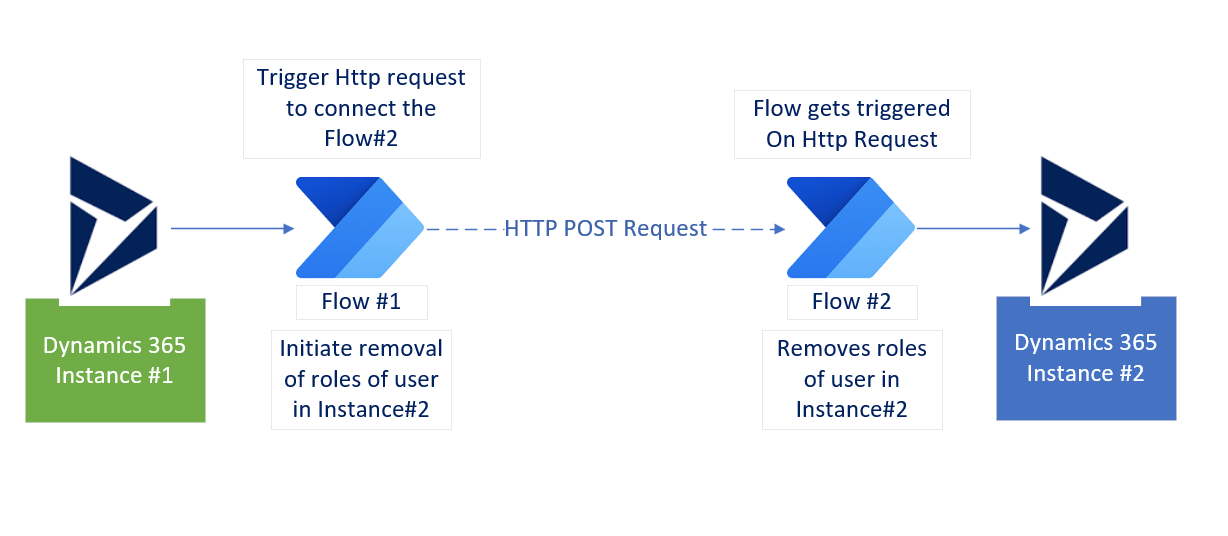
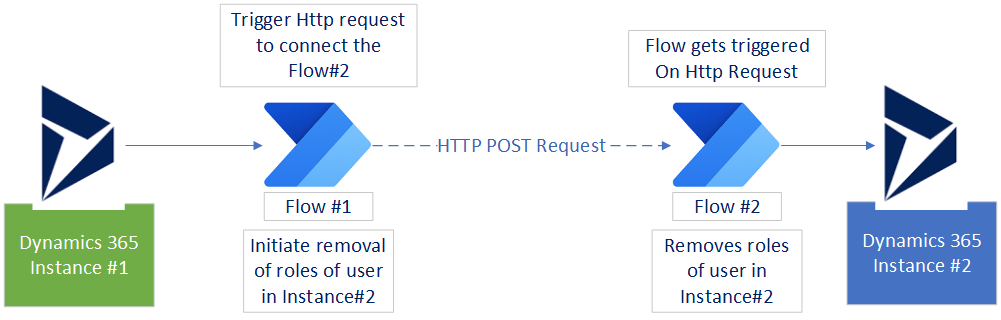
Scenario we are going to achieve using Power Automate:
Let’s say we have two Dynamics 365 instances Instance#1 and Instance#2. Requirement is to remove a specific user’s roles in instance #2 by trigerring a flow in instance #1.
High Level Design for the solution would be:
Implementation: Steps to achieve this:
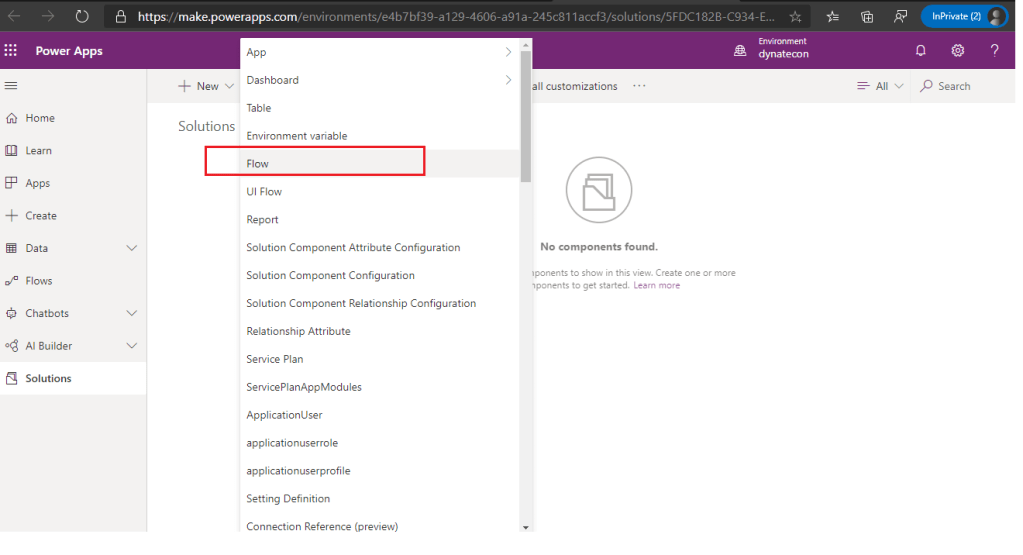
A. Create the Target Flow (Flow#2) in the Instance#2:
- Go to make.powerapps.com and select the environment and create a new solution (or open existing solution) and create a new Flow.
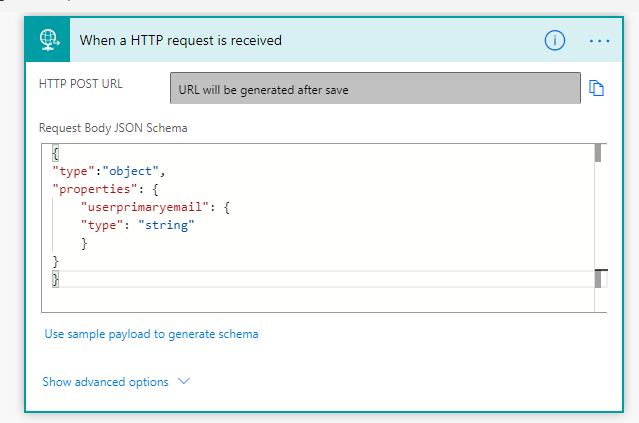
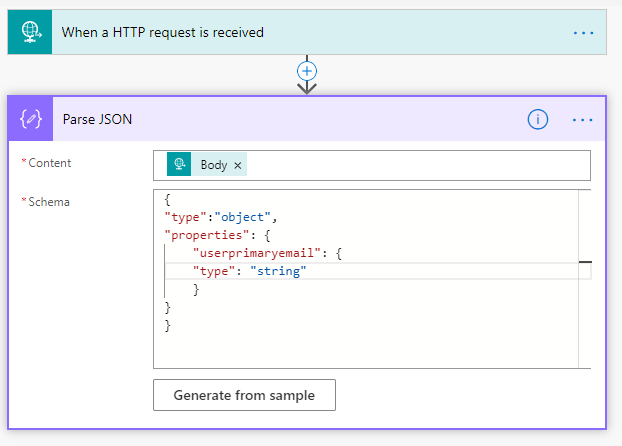
2. Select flow Trigger as ‘When an HTTP request is received‘

3. Update the Request Body as per the requirement. In our case we are just passing the user’s primary email address in the request body. ‘HTTP POST URL’ will be auto populated later when we save the flow.
4. Add the next Action ‘Parse JSON’ and set the Content as ‘Body’ from the HTTP request and Schema – same as what’s put in step#3.
5. Next action is to fetch the User based on the primary email address. Create an Action using CDS (Current Environment) Connector to List records.
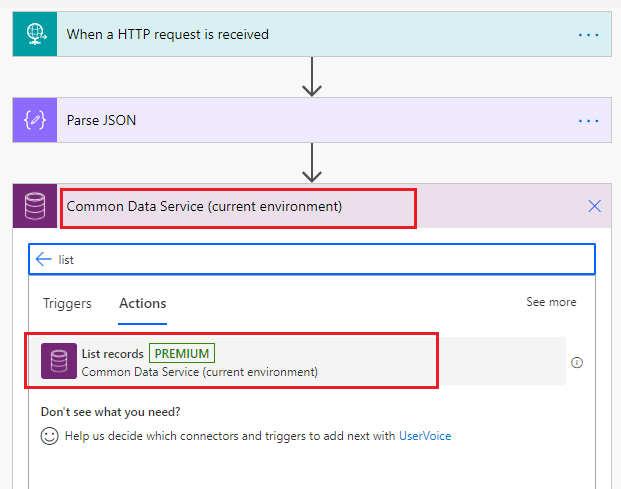
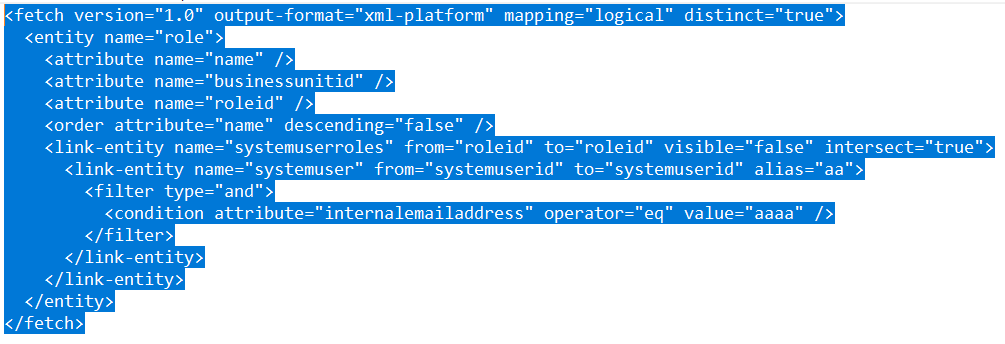
6. If you are using the ‘List records’ action within CDS(Current Environment), we have the option to use Fetch Xml to fetch the data. And it’s easy to prepare the Fetch XML using ‘Advanced Find’.

7. For those who are not sure about how to get the FetchXML query from Advanced Find: In the Advanced Find, once the critieria is selected and the columns are selected, click on ‘Download Fetch XML’ to get the Fetch XML query.
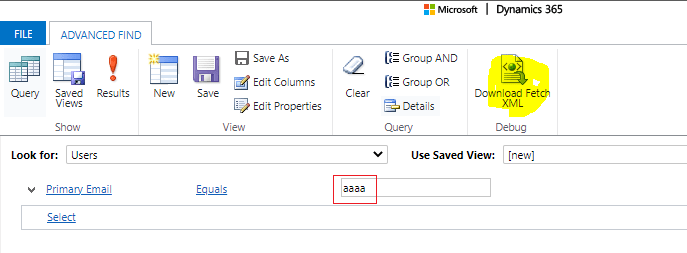
8. Note: We just placed a dummy value to get the query. This can be replaced with the dynamic value in the Power Automate query.

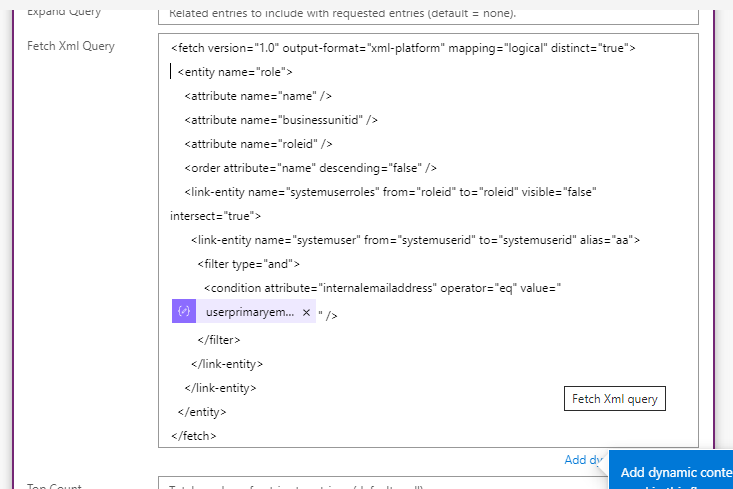
9. Copy the Fetch XML query in the ‘Fetch XML’ field in the List records’ action

10. Replace the dummy value in the query with the Dynamic value (userprimaryemail) from ‘Parse JSON’ action

It would look like this then.

11. Also, as a best practice it’s better to rename the flow action step with a meaningful title as it wont be confusing in the later steps. Let’s change it to ‘Fetch User Record From Primary Email’

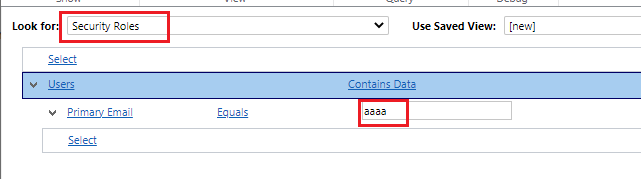
12. Next step is to fetch the security roles assigned to the specific user account. Add a new action to List records using CDS(Current environment) connector.

13. Select the Entity name as ‘Security Roles‘. Here also, we can frame the Fetch XML query using ‘Advanced Find’ and use it in the action.

Advanced Find – Criteria
Fetch XML generated
14. Replacing the dummy value in the query using Dynamic Value. laso rename the flow step to a meaning ful one.
15. We now have the user details and roles assigned to the user. Next action is to remove each role from the user. Basically we need to remove the relationship records and we can use the ‘Unrelate records’ action available in the Common Data Service (Current Enviornment) connector. Please note that, as of now this action is not available in Common Data Service connector.
📌 Note: Similarly for adding roles to a user acccount, we can make use of ‘Relate records’ action

16. ‘Unrelate records’ action requires 4 paramters
✏️ Entity name: primary entty name. In our case ‘Users’
✏️ Item ID: Primary entity record. In this case, user record id
✏️ Relationship: Based on the ‘Entity Name’, list of relationships will be populated. Choose the right one
✏️ URL: primarily the url to the secondary entity record (in this case, each security role id)

17. Apart from URL, other fields are straighforward. URL field can be set with Odata Id from the ‘Fetch Roles Assigned To User‘ action

✏️It looks like this after you set all the parameters

18. Save the flow and the HTTP POST URL would be auto populated. We would need this to call this flow from the Source flow (Flow#1)

B. Create Source Flow (Flow#1) in the Instance#1
- Create a new flow in the Instance#1. For test purpose, lets make it a Manually trigger flow as we only need to check if we can initiate the flow in the Instance#2 from Instance#1.
2. Add an ‘HTTP’ action which uses HTTP connector

3. Select Method as POST and paste the url generated in the Flow#2 in the URI field. Set the Body of the HTTP request which matches the HTTP request schema – In our case, we are just passing the user’s primary email – for whom the roles to be removed in the Instance#2. Save the Flow and we are ready to test.

Time to Test the Solution
- Before we test it out, lets chck if the user has any roles assigned. This user has ‘Account Manager’ role assigned.

2. Lets run the Flow#1 in Instance#1

3. Flow#1 has ran successfully.

4. Flow#2 was triggerred and ran successfully as well 👍


5. And yes, the roles of the ‘Demo User’ have been removed in Instance#2.👍 💪🏻

This is a sample scenario and this can be extended and can be used for different use cases.
Hope this post is helpful! Please subscribe to our blog if you wish to receive our latest posts.
