
Canvas App
Canvas apps are true low-coding apps, they do not require coding know-how. The users have full control over every single aspect of the resulting app, including size and formatting of its components. Since Canvas app allow for a high degree of creativity and flexibility.
The Canvas apps are mainly used for mobile devices. It is not restricted to a particular data source. There are around 200 connectors available to integrate existing data easily, among those SharePoint, Dynamics 365. Once created, Canvas apps can easily be shares with the rest of the organization.
Model-driven App
The Model-driven app follow a data-first approach. They have the ability to make data models and are thus best suitable for more complex and sophisticated business applications.
He Model-driven apps are based on CDS and executed in Dynamics 365. Users have less control over layout and functionality than with Canvas apps.
In the Low-code approach of Microsoft, embedding Canvas app in Model-driven app is one of the prominent rollouts.
More sophisticated and specific business needs can be achieved by embedding Canvas app into Model-driven app.

Use Case
In the Lead form instead of manually entering the address details, we need a canvas app with an interactive map. On clicking the location in the Interactive map, the address details mut be captured.
For that the first step is to create a Canvas app with interactive map.
To see how to setup an Interactive map please refer to the link below.
Use an interactive map control in Power Apps – Power Apps | Microsoft Docs
Once the Canvas app is ready, we are all set to embed it to our Model-driven app.
Open the Form in which you want to embed the Canvas App and click button “Switch to classic”. In the Form, add a field where you want to display the Canvas App. You must take a field that will have a value for sure. If it doesn’t have a value, the Canvas App will not refresh in response to any change in data on the host model-driven form.
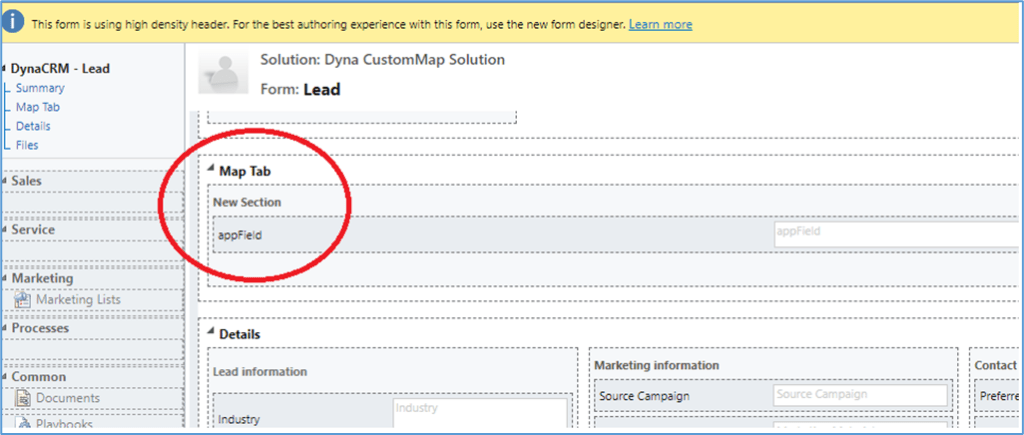
In our case we will create a new field ‘appField’ where the canvas app will be inserted.
We will create an entire new tab named ‘Map Tab’ and in the ‘New Section’ add the field ‘appField’.
Now double click on the ‘appField’ to go to the Field Propertied. And in the form properties, go to the Controls tab.

In the Controls tab, click on Add Control and select Canvas App from the list.
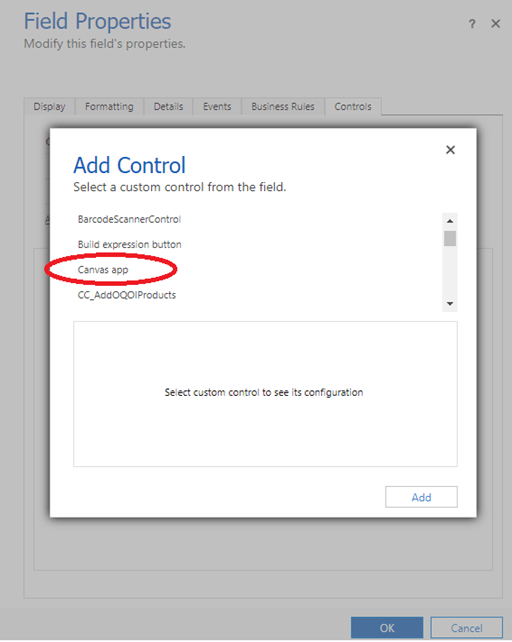
In the property section Entity name, App name and App ID must be given.
App name and App ID of the Canvas app is available in the details section of the app. On adding the three parameters click on OK.

Now Save and Publish the Form.
Once the customizations are successfully published, we can see the Canvas app embedded in the Model-driven app.

We can see that the Canvas app has got embedded into the Model-driven app. And instead of adding the Country, Postal code, Address, Latitude and Longitude manually, it can be achieved by just a click in the Interactive map.
