

 Written by
 Elastic Tables in Dataverse: When to Use Them (And How to Implement Them Step by Step)
Your Dataverse environment suddenly has 3 million log records.
API calls are slowing down.
Users start complaining about performance.
During a design review, someone asks:
Why didn’t we use Elastic tables? But what are Elastic tables really — and when should we use them?
Let’s break it down — strategically and practically.
What Are Elastic Tables?
In Dataverse, Elastic tables are designed for:
- High-volume data storage
- Write-heavy workloads
- Log-style or event-driven scenarios
They are optimized differently from standard tables. Instead of focusing on complex relational behavior, Elastic tables prioritize scale and throughput.
They are ideal for:
- Telemetry data
- Integration logs
- Audit events
- IoT ingestion
However, they are not meant for relational-heavy business data like Accounts or Orders.
Standard vs Elastic Tables: A Strategic Comparison
Choosing between standard and Elastic tables is not about “better” or “worse.”
It’s about use case alignment.
| Feature | Standard Table | Elastic Table |
|---|---|---|
| Best for | Core business data | Logs & high-volume data |
| Relationships | Full support | Limited |
| Business rules | Yes | Limited |
| Scale | Moderate | Very high |
| Performance focus | Balanced | Write optimized |
Standard tables are built for structured, relational business applications.
Elastic tables are built for scale and ingestion.
Elastic tables are not better.
They are specialized.
Now let’s implement one.
Step-by-Step: How to Create an Elastic Table in Dataverse
Step 1: Open Power Apps
Go to:
Select your environment.
Step 2: Go to Solutions
In the left navigation, click: Solutions
Then:
- Click New solution (if you don’t already have one)
- Or open an existing Unmanaged Solution
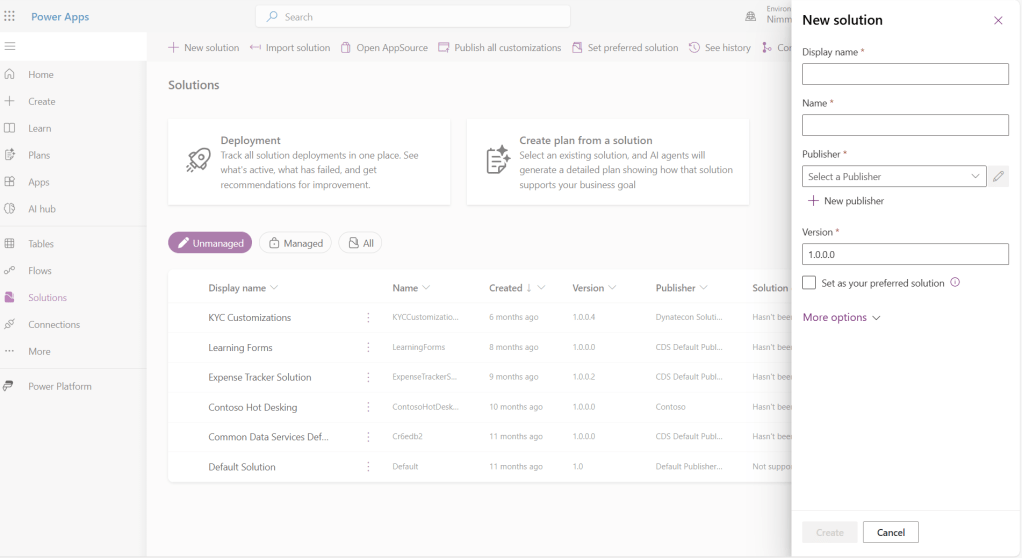
Always create tables inside a Solution for proper ALM, version control, and deployment across environments.
Step 3: Create the Elastic Table Inside the Solution
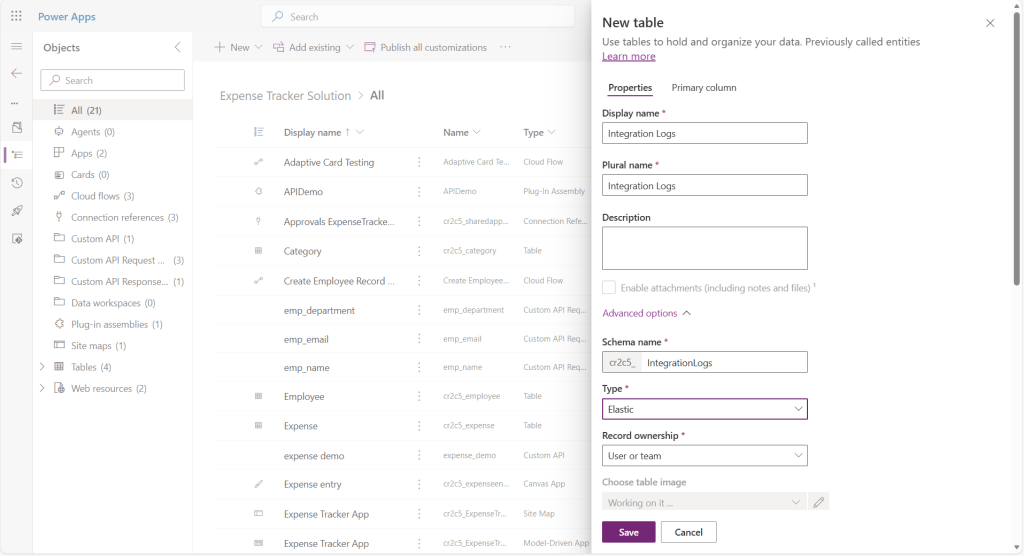
Inside your solution, click: New → Table
Then:
- Enter your Table name
- Set the Primary column
- Expand Advanced properties
Under Table type, select: Elastic
Step 4: Add Columns
After saving:
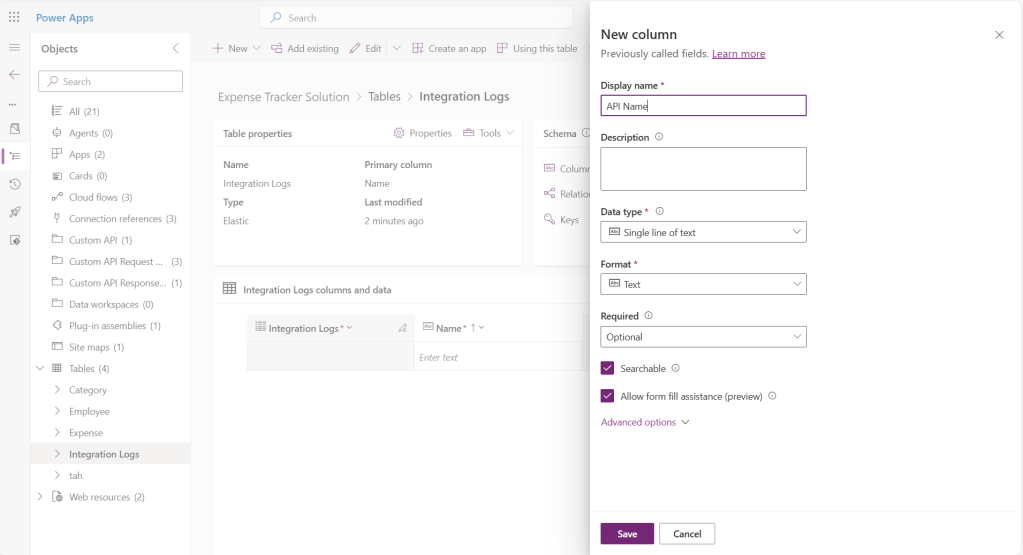
Go to: Columns → New column
Add fields such as:
- API Name (Text)
- Status (Choice)
- Response Time (Number)
- Timestamp (DateTime)
- Payload Size (Number)
Step 5: Use It in a Real Scenario
You can:
- Create a simple record manually
- Show Power Automate writing into the table
- Show record count increasing
When Should You Avoid Them?
Do not use Elastic tables for:
- Accounts
- Contacts
- Orders
- Relationship-driven apps
- Scenarios requiring advanced business logic
If your data model depends heavily on structure and relationships, standard tables remain the right choice.
Final Thoughts
Elastic tables are a powerful addition to Dataverse — but only when used intentionally.
If your challenge is scale, they are worth evaluating.
If your challenge is relational modeling, they are not the solution. The real skill isn’t knowing how to create an Elastic table.
It’s knowing when your architecture truly needs one.
References
Microsoft Learn – Create and manage tables in Dataverse
https://learn.microsoft.com/en-gb/power-apps/maker/data-platform/create-edit-entities-portal?tabs=excel
Microsoft Learn – Elastic tables in Dataverse
https://learn.microsoft.com/en-gb/power-apps/developer/data-platform/elastic-tables
Microsoft Learn –Dataverse Capacity & Storage
https://learn.microsoft.com/en-gb/power-platform/admin/capacity-storage

